User guide
Table of contents
Getting Started
Advanced user guide
Features for expert users/system administrators
Quickstart - Test the app with built-in examples
PDF document examples
The app provides some built-in examples so you can see how it works before trying one of your own files.
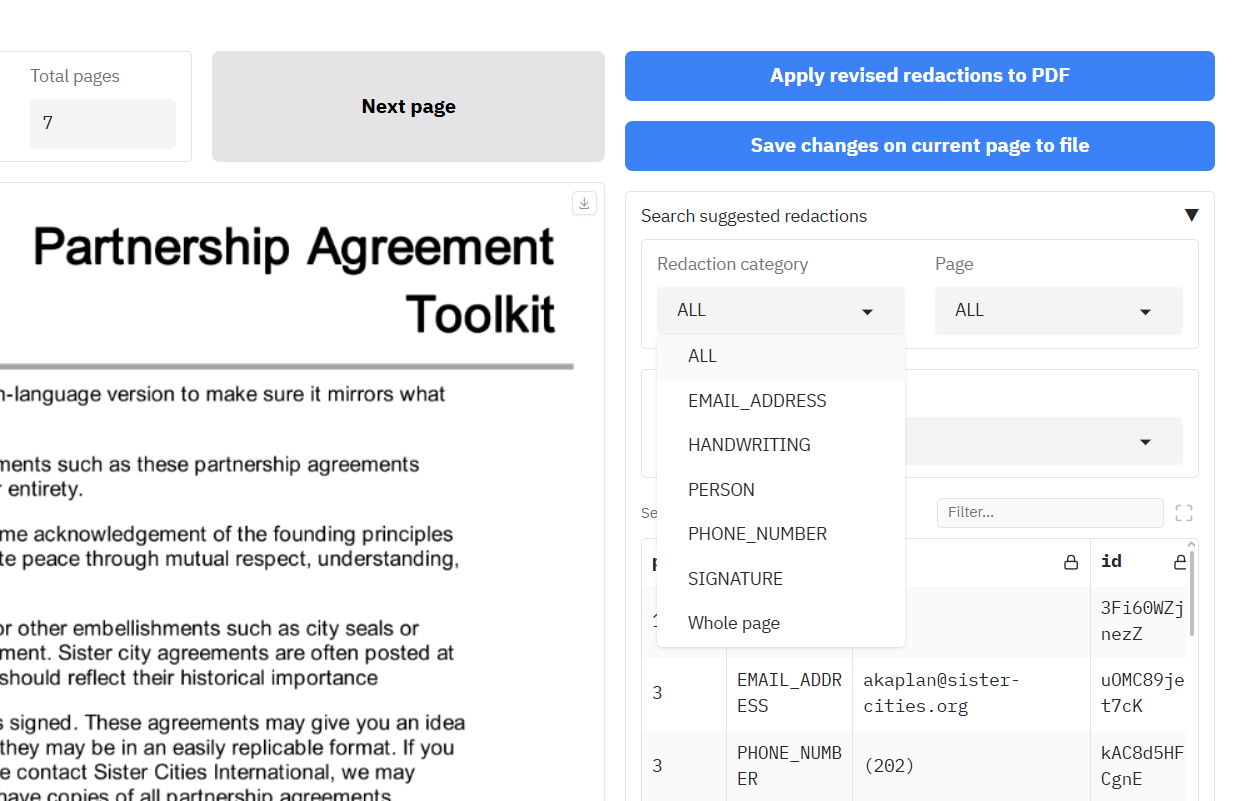
For PDF/image redaction: On the ‘Redact PDFs/images’ tab, you’ll see a section titled “Try an example - Click on an example below and then the ‘Extract text and redact document’ button”. Simply click on any of the available examples to load them with pre-configured settings:
- PDF with selectable text redaction - Uses local text extraction with standard PII detection
- Image redaction with local OCR - Processes an image file using OCR
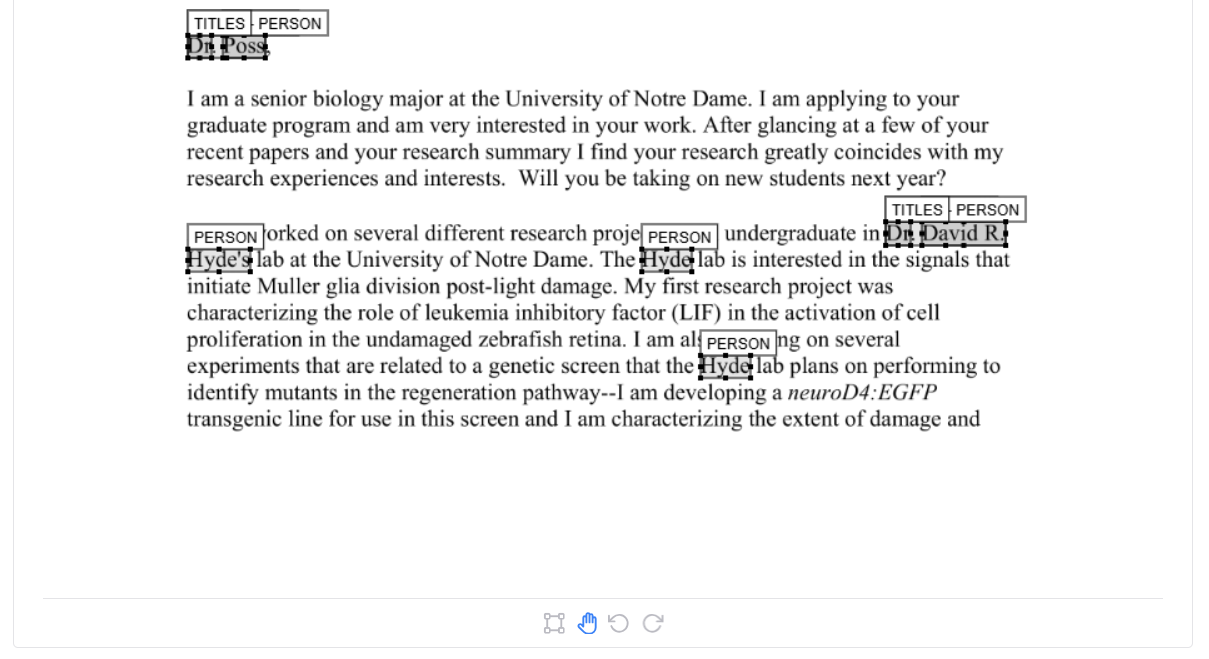
- PDF redaction with custom entities - Demonstrates custom entity selection (Titles, Person, Dates)
- PDF redaction with AWS services and signature detection - Shows AWS Textract with signature extraction (if AWS is enabled)
- PDF redaction with custom deny list and whole page redaction - Demonstrates the use of redacting specific named terms and whole pages
Once you have clicked on an example, you can click the ‘Extract text and redact document’ button to redact the document. You can then click the ‘Review and modify redactions’ button below this to review and modify suggested redactions. See the ‘Basic redaction’ section below for more details on redacting your own documents.
CSV/Excel file examples
For tabular data: On the ‘Word or Excel/CSV files’ tab, you’ll find examples for both redaction and duplicate detection:
- CSV file redaction - Shows how to redact specific columns in tabular data
- Word document redaction - Demonstrates Word document processing
- Excel file duplicate detection - Shows how to find duplicate rows in spreadsheet data
Once you have clicked on an example, you can click the ‘Redact text/data files’ button directly to redact the example file. Once done, you can click the ‘Review redactions’ button to review and modify suggested redaction boxes.
Basic redaction
The document redaction app can detect personally-identifiable information (PII) in documents. Documents can be redacted directly, or suggested redactions can be reviewed and modified using a graphical user interface. Basic document redaction can be performed quickly using the default options.
Where to work: All of the main redaction options and the redact button are on the ‘Redact PDFs/images’ tab.
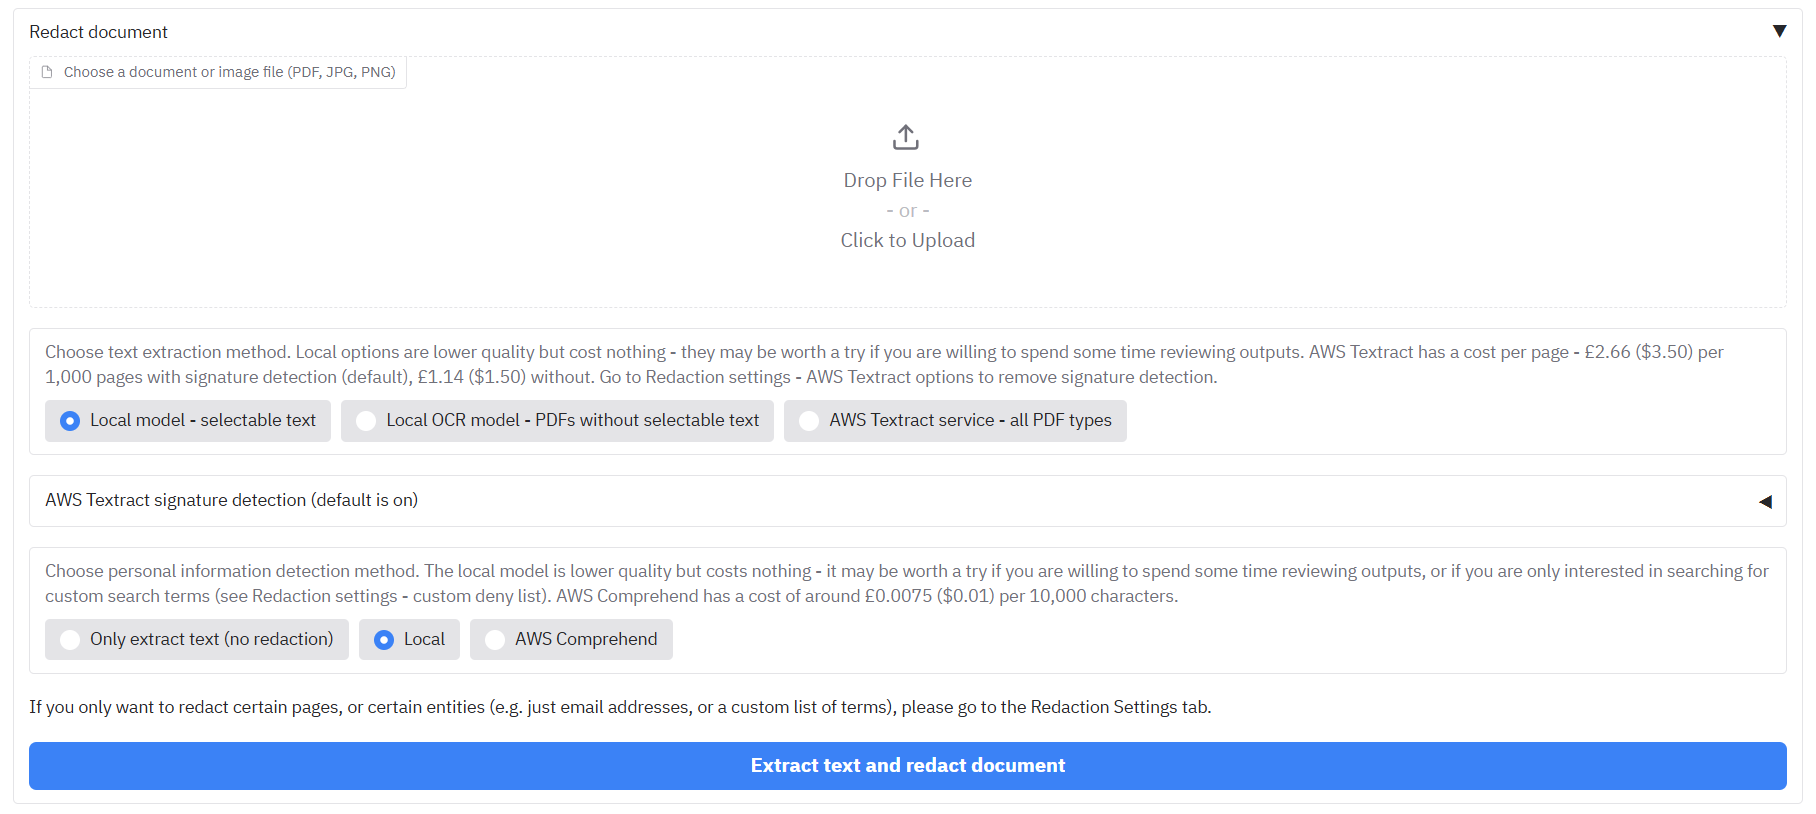
Upload files to the app
On the ‘Redact PDFs/images’ tab, the ‘Redaction settings’ accordion at the top accepts PDFs and image files (JPG, PNG) for redaction. Click on the ‘Drop files here or Click to Upload’ area, or select from one of the examples provided.
Text extraction
Under ‘Redaction settings’ accordion, you can see ‘Change default text extraction settings’. You may have the following options available depending on your configuration - if not, AWS Textract will likely be the default option:
- ‘Local model - selectable text’ - (optional) Reads text directly from PDFs that have selectable text.
- ‘Local OCR model - PDFs without selectable text’ - (optional) Uses a local OCR model to extract text from PDFs/images. Handles most typed text without selectable text but is less accurate for handwriting and signatures; use the AWS Textract option in this case.
- ‘AWS Textract service - all PDF types’ - Available when the app is configured for AWS. Textract runs in the cloud and is more capable for complex layouts, handwriting, and signatures. It incurs a (relatively small) cost per page.
AWS Textract signature extraction
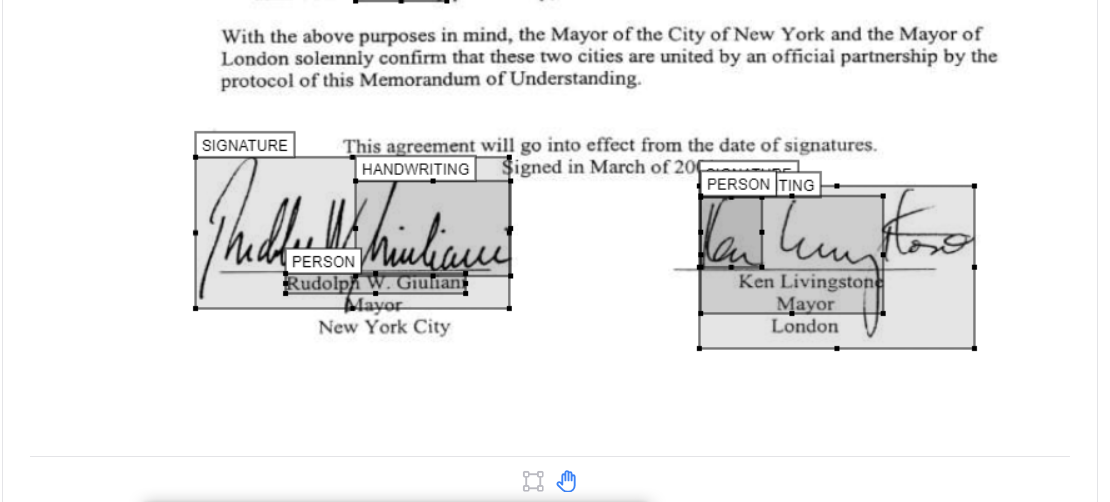
If you select ‘AWS Textract service - all PDF types’ as the text extraction method, an accordion ‘Enable AWS Textract signature detection (default is off)’ appears. Open it to turn on handwriting and/or signature detection. Enabling signatures has a cost impact (~£2.66 ($3.50) per 1,000 pages vs ~£1.14 ($1.50) per 1,000 pages without signature detection).
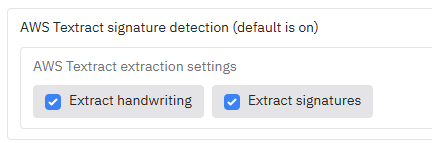
NOTE: Form, layout, table extraction, or face detection can be enabled if required for specific use cases; they are off by default - please contact your system administrator if you need these features.
PII redaction method
Next we need to choose our model to identify personally-identifiable information (PII) in the document. Under ‘Change PII identification method’ accordion (under ‘Change default redaction settings’) you will see ‘Choose redaction method’, a radio with three options: - ‘Extract text only’ runs text extraction without redaction — useful when you only need OCR output or want to review text before redacting. - ‘Redact all PII’ (the default) uses the chosen PII detection method to find and redact personal information across a range of standard entity types, e.g. addresses, names, dates, etc. - ‘Redact selected terms’ will focus redaction only on the specific terms in the custom allow/deny lists below.
Still under ‘Change default redaction settings’, you may see the ‘Change PII identification model’ section, if enabled, which lets you choose how PII is detected. You may have the choice of the following options. If not, AWS Comprehend will likely be the default option:
- ‘Local’ - (optional) Uses a local model (e.g. spaCy) to detect PII at no extra cost, but with less accuracy than the alternative options.
- ‘AWS Comprehend’ - Uses AWS Comprehend for PII detection when the app is configured for AWS; typically more accurate but incurs a cost (around £0.0075 ($0.01) per 10,000 characters).
- Other options may be available depending on the app settings (e.g. AWS Bedrock, local LLM models).
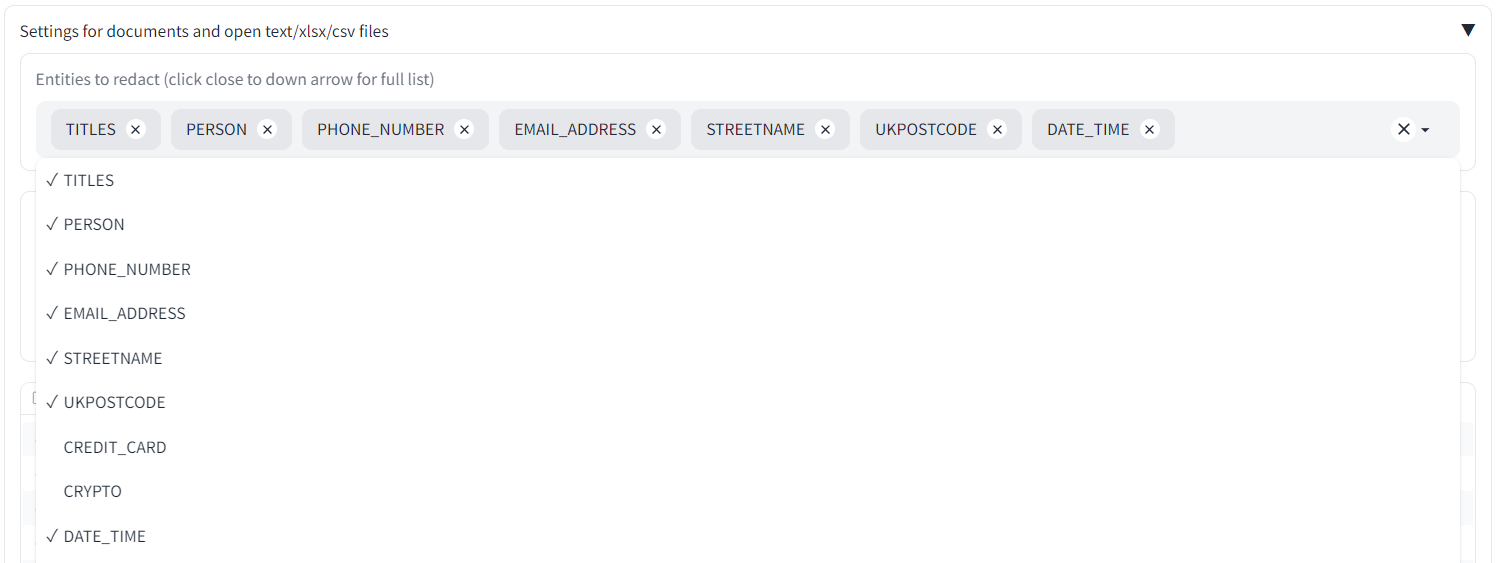
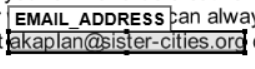
Under ‘Select entity types to redact’ you can choose which types of PII to redact (e.g. names, emails, dates). Click in the box or near the dropdown arrow to see the full list. Any entity type that remains in the box will be searched for during the redaction process.
Duplicate page redaction
Alongside the ‘Change PII identification method’ section, you will see ‘Redact duplicate pages’. If this is enabled, following the main redaction process, the app will identify pages with duplicate text in the document and redact them in the same run. If you want to modify the duplicate page detection settings, you can do so on the Identify duplicate pages tab - please refer to the Identifying and redacting duplicate pages section for more details.
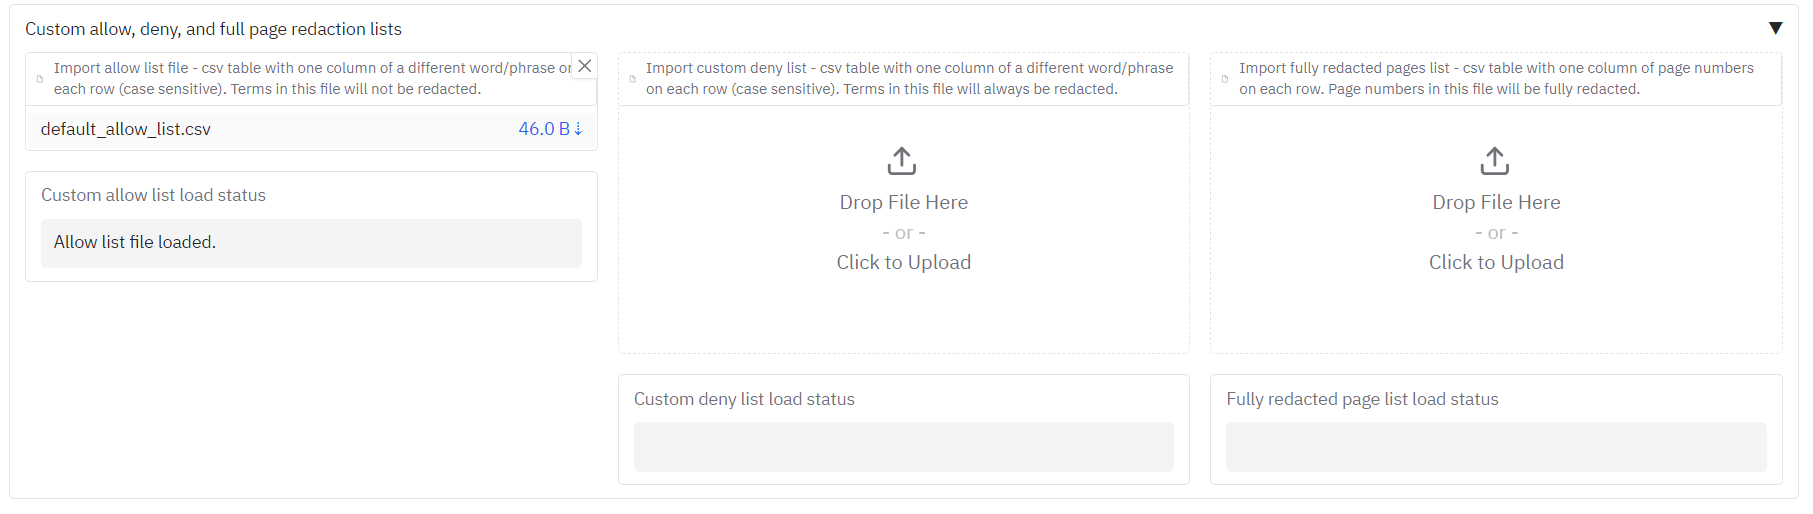
Allow list, deny list, and whole-page redaction
Underneath you will see ‘Terms to always include or exclude in redactions, and whole page redaction’. Here you can:
- Allow list – Terms that if found, will never be redacted. To use, ensure that CUSTOM is selected in the ‘Select entity types to redact’ dropdown.
- Deny list – Terms that if found, will always be redacted. To use, ensure that CUSTOM is selected in the ‘Select entity types to redact’ dropdown.
- Fully redact these pages – Page numbers that will be fully redacted with a box that covers the entire page.
- Maximum spelling mistakes for matching deny list terms – Number (0–9) used for fuzzy matching for terms in the Deny list when CUSTOM_FUZZY is selected in the entity list. For example, if this is set to 1, then all terms set in the Deny list will be matched with up to 1 spelling mistake. Note that setting this value greater than 0 will increase the time taken to redact the document.
To add items to the allow list, deny list, or fully redacted pages list, you can do so by typing the item into the box and pressing enter. You can also remove items by clicking the ‘x’ next to the item, or pressing the backspace key when the box is selected.

You can add or remove terms directly in these controls. To load many terms from a file (e.g. a CSV), use the file upload areas at the top of the Settings tab. If you upload a csv into one of these boxes containing a single column of terms, the terms will be loaded into the allow list, deny list on the Redact PDFs/images tab. Similarly, if you upload a csv into the ‘Fully redact these pages’ box containing a single column of page numbers, the pages will be fully redacted on the next redaction run, and the relevant box on the Redact PDFs/images tab will be filled with the page numbers.
Cost and time estimation
If enabled, an ‘Estimated costs and time taken’ section appears on the ‘Redact PDFs/images’ tab. ‘Existing Textract output file found’ (or ‘Existing local OCR output file found’) is ticked automatically when previous extraction output for the same document already exists in the output folder or was uploaded by you, which indicates that the text extraction process will not be repeated for future redaction tasks.

Cost code selection
If cost codes are enabled, an ‘Assign task to cost code’ section appears on the same tab. Choose a cost code before running redaction. You can search the table or type in the ‘Choose cost code for analysis’ dropdown to filter. You can then set a default cost code for future redaction tasks with your login by clicking on the ‘Set default cost code’ button.

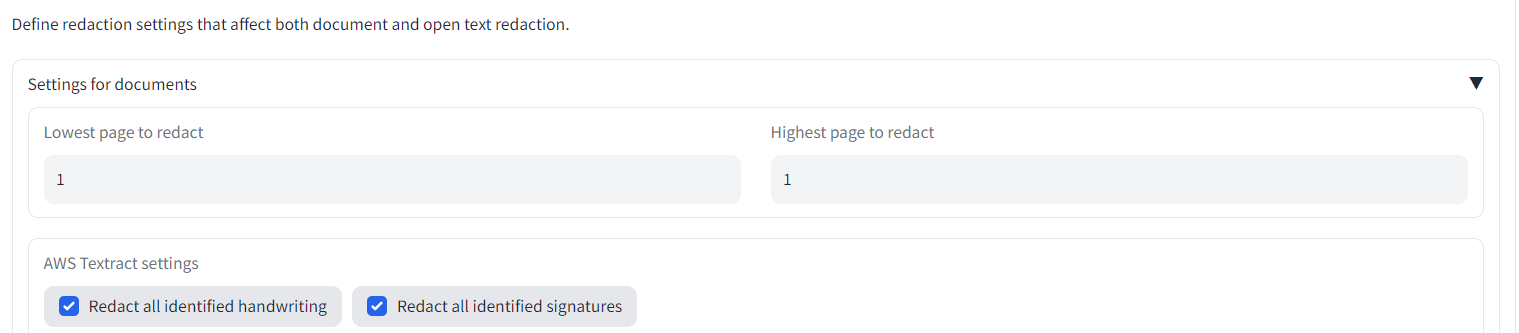
Redact only specific pages
To redact only a subset of pages (e.g. only page 1), go to the Settings tab and open the ‘Redact only selected pages’ accordion. Set ‘Lowest page to redact (set to 0 to redact from the first page)’ and ‘Highest page to redact (set to 0 to redact to the last page)’ (e.g. both 1 for only page 1). The next redaction run will only process that range; output filenames will include a suffix like **’…_1_1.pdf’**.
Run redaction
Once all the above settings have been prepared, at the bottom of the ‘Redact PDFs/images’ tab, open the ‘Extract text and redact document’ accordion and click ‘Extract text and redact document’. The app will process the document (typically around 30 pages per minute, depending on options). When finished, a message will indicate completion and output files will appear in the ‘Output files’ area. Use ‘Review and modify redactions’ to open the review tab.
Redaction outputs
After you click ‘Extract text and redact document’, the ‘Output files’ area on the ‘Redact PDFs/images’ tab shows:

- ‘…redacted.pdf’ – The original PDF with suggested redactions applied (text removed and replaced by a black box).
- ‘…redactions_for_review.pdf’ – The original PDF with redaction boxes overlaid but text still visible. Use this in Adobe Acrobat or other PDF viewers to review suggested redactions before finalising.
- ‘…ocr_outputs.csv’ – Line-by-line extracted text from the document (useful for searching text in Excel or similar).
- ‘…ocr_outputs_with_words.csv’ – Word-level extracted text from the document with bounding boxes .
- ‘…review_file.csv’ – Details and locations of all suggested redactions; required for the review process.
Additional AWS Textract / local OCR outputs
You may also see a **’…_textract.json’** file, and/or a ‘…ocr_outputs_with_words.json’ file. You can save this to your computer, and upload it later alongside your input document to skip calling Textract again for the same document:

Log file outputs and other optional outputs
On the Settings tab, open the ‘Log file outputs’ accordion to access log and optional output files. You may see a ‘decision_process_table.csv’ (decisions made per page) and, if enabled by your administrator, **’…_visualisations.jpg’** images showing OCR bounding boxes per page:
Downloading output files from previous redaction tasks
If you are logged in via AWS Cognito and lose the app page (e.g. after a crash or reload), you may still be able to recover output files if the server has not been restarted. When enabled, open the Settings tab and use ‘View and download all output files from this session’ at the bottom. Click ‘Refresh files in output folder’, then tick the box next to a file to display and download it.

Reviewing and modifying suggested redactions
Sometimes the app will suggest redactions that are incorrect, or will miss phrases with personal information. The app allows you to review and modify suggested redactions to compensate for this. You can do this on the ‘Review redactions’ tab.
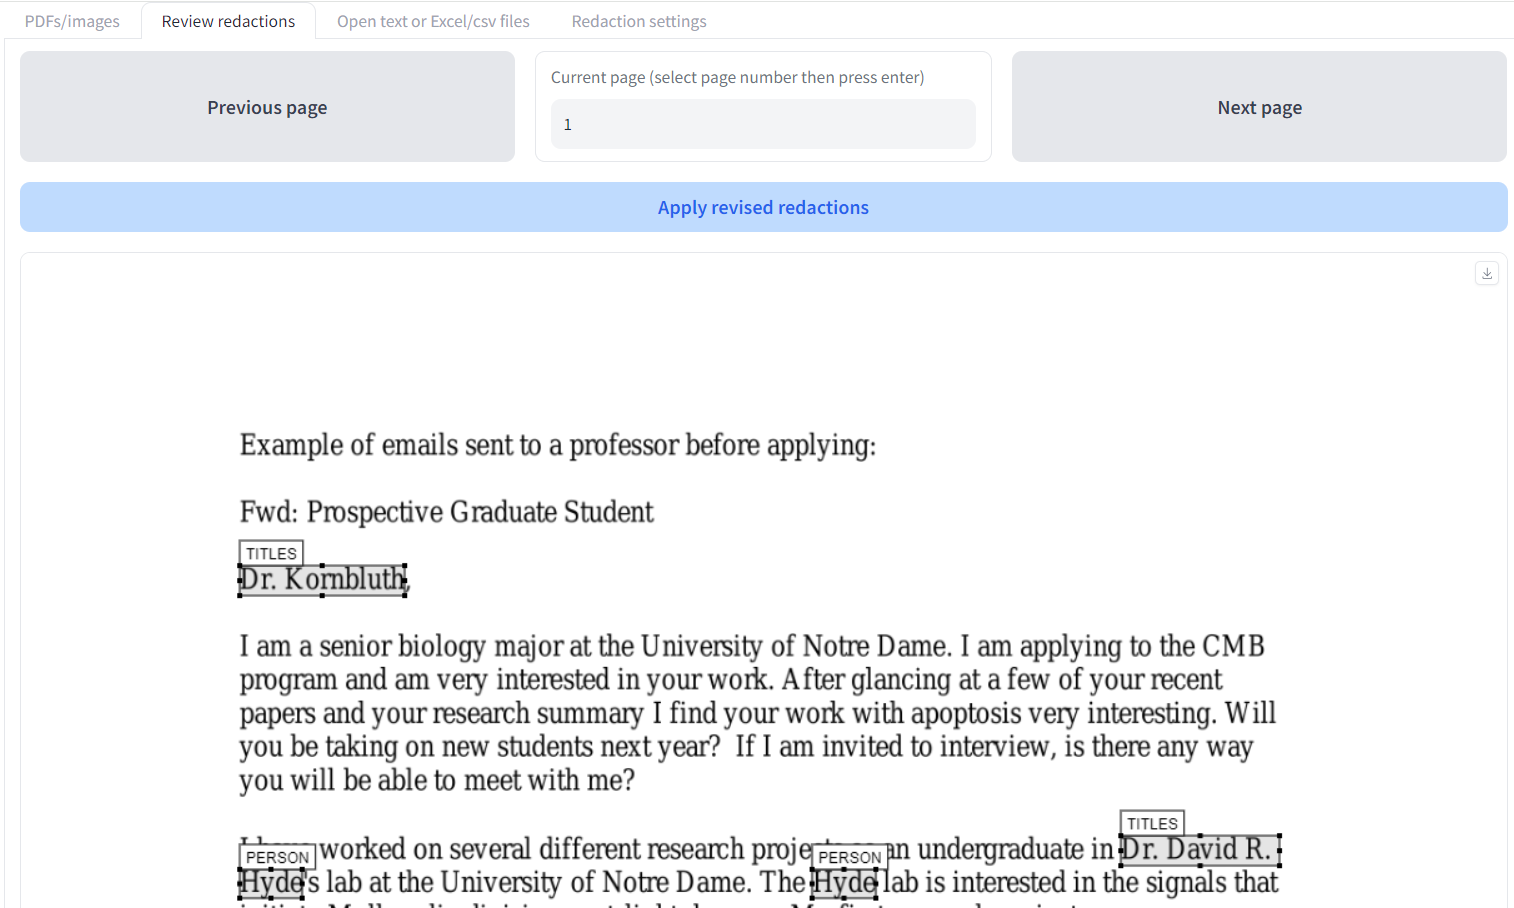
We will go through ways to review suggested redactions with an example. On the ‘Redact PDFs/images’ tab, upload the ‘Example of files sent to a professor before applying.pdf’ file. Keep the default ‘Local model - selectable text’ option and click ‘Extract text and redact document’. Once the outputs are created, go to the ‘Review redactions’ tab.
On the ‘Review redactions’ tab you have a visual interface that allows you to inspect and modify redactions suggested by the app. There are quite a few options to look at, so we’ll go from top to bottom.
Uploading documents for review
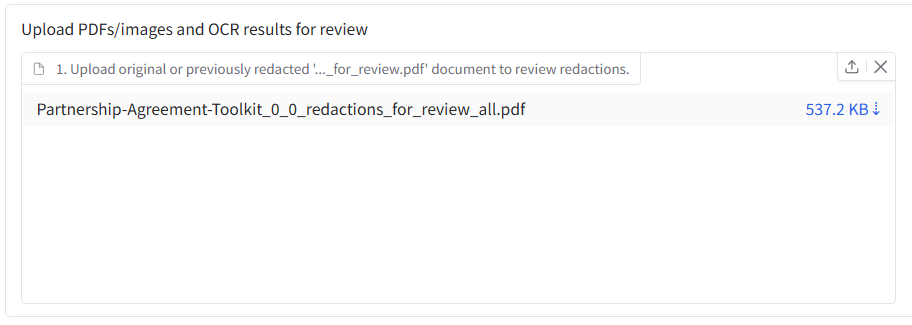
The top area has a file upload area where you can upload documents to review redactions. If you have just done a redaction task, these boxes should already be filled with the relevant files. In the left box (1.), upload the original PDF file. If you have a document that you have previously redacted, you can also upload the ‘…redactions_for_review.pdf’ file that is produced by the redaction process, which will load in the previous redactions.
In the second input file box to the right (2.), you can upload a ’…_ocr_result_with_words’ file, that will allow you to search through the text and easily add new redactions based on word search. You can also upload one of the ’…_ocr_output.csv’ file here that comes out of a redaction task, so that you can navigate the extracted text from the document. Click the button ‘2. Upload Review or OCR csv files’ load in these files.
Now you can review and modify the suggested redactions using the interface described below.

Document viewer
In the centre left of the tab, you will see the first page of the document. On the selected page, each redaction is highlighted with a box next to its suggested redaction label (e.g. person, email). To zoom in and out of the page, use your mouse wheel. When selected, press spacebar to go back to the default zoom.
There are a number of different options to add and modify redaction boxes and page on the document viewer pane. At the top and bottom of the document viewer, you will see controls to add and modify redaction boxes. You should see a box icon, a hand icon, and two arrows pointing counter-clockwise and clockwise (details below).
Modify existing redactions (hand icon)
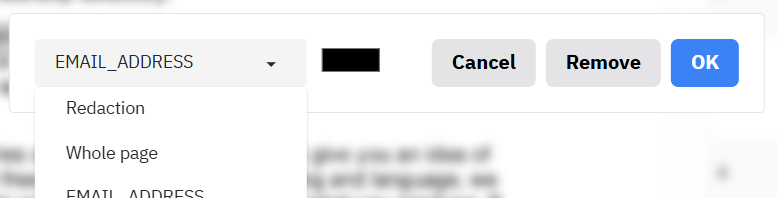
After clicking on the hand icon (or press ‘d’ on your keyboard when the document viewer is selected), the interface allows you to modify existing redaction boxes. When in this mode, you can click and hold on an existing box to move it. Click on one of the small boxes at the edges to change the size of the box. Double click on a box to enter the menu to change label, colour, or remove the box.
To delete a box, click on it to highlight it, then press delete on your keyboard. Alternatively, double click on a box and click ‘Remove’ on the box that appears.
Add new redaction boxes (box icon)
To change to ‘add redaction boxes’ mode, scroll to the bottom of the page. Click on the box icon, and your cursor will change into a crosshair. Now you can add new redaction boxes where you wish. A popup will appear when you create a new box so you can select a label and colour for the new box.
‘Locking in’ new redaction box format
It is possible to lock in a chosen format for new redaction boxes so that you don’t have the popup appearing each time. When you make a new box, select the options for your ‘locked’ format, and then click on the lock icon on the left side of the popup, which should turn blue.

You can now add new redaction boxes without a popup appearing. If you want to change or ‘unlock’ the your chosen box format, you can click on the new icon that has appeared at the bottom of the document viewer pane that looks a little like a gift tag. You can then change the defaults, or click on the lock icon again to ‘unlock’ the new box format - then popups will appear again each time you create a new box.

Saving new page redactions on the Document viewer pane
If you are working on a page and you have created boxes manually or modified existing boxes, you are advised to click on the ‘Save changes on current page to file’ button to the right to ensure that they are saved to your output files.
Modify existing redactions
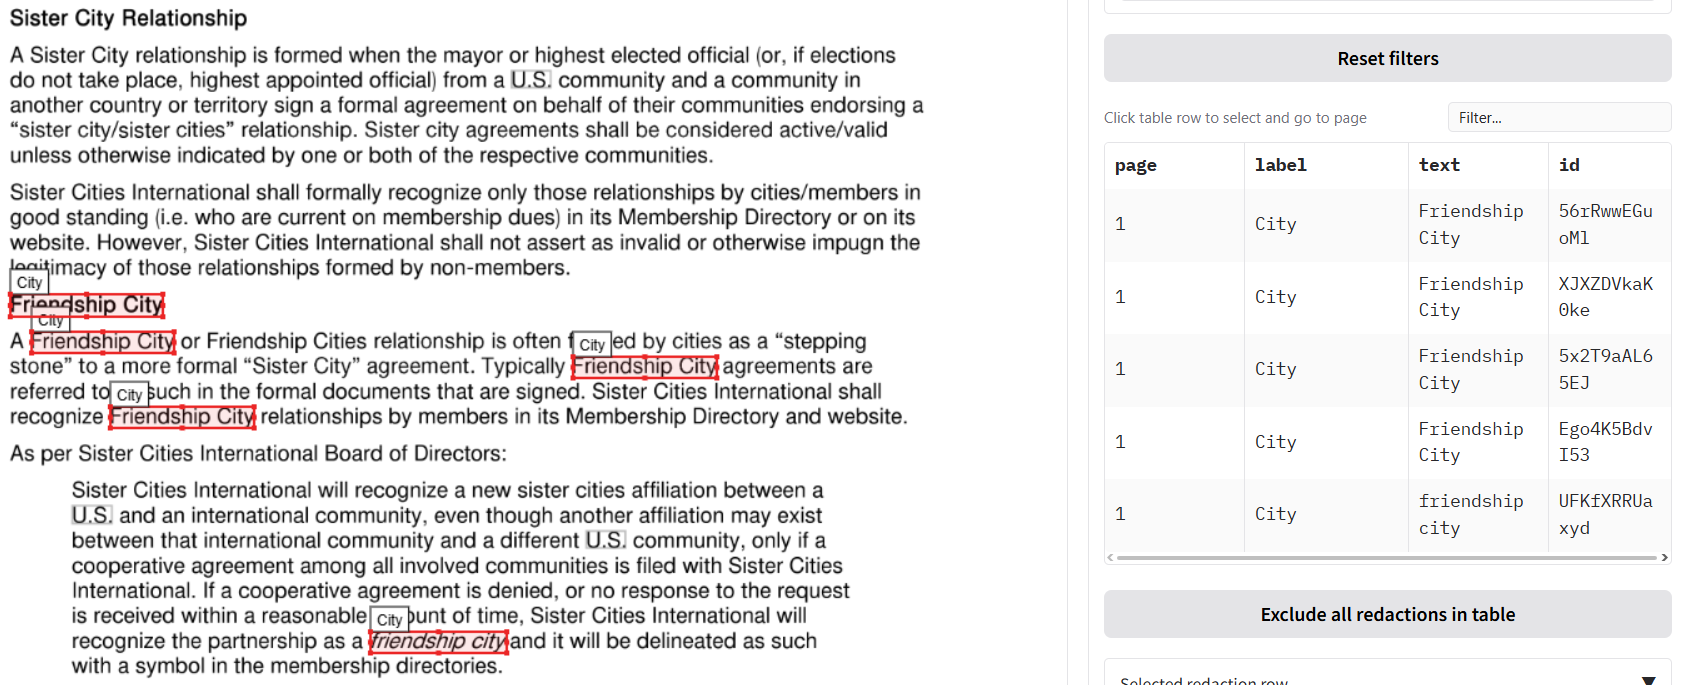
To the right of the Document viewer pane you should see a heading above a table called ‘Modify redactions’ (see below). The table shows a list of all the suggested redactions in the document alongside the page, label, and text (if available).
If you click on one of the rows in this table, you will be taken to the page of the redaction. Clicking on a redaction row on the same page will change the colour of redaction box to blue to help you locate it in the document viewer (just when using the app, not in redacted output PDFs).
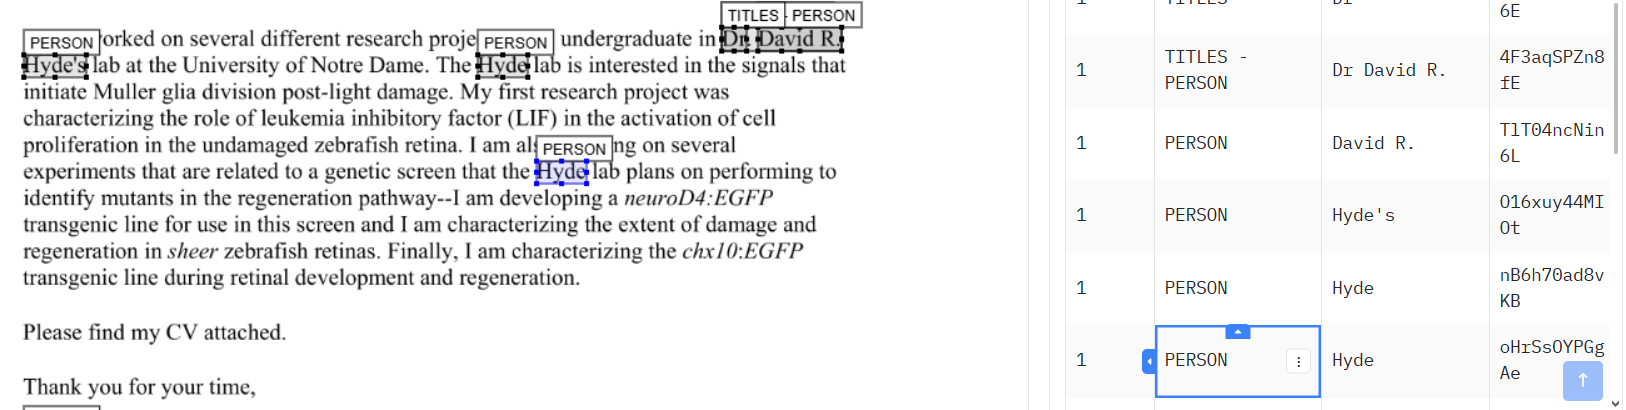
You can choose a specific entity type to see which pages the entity is present on. If you want to go to the page specified in the table, you can click on a cell in the table and the review page will be changed to that page.
To filter the ‘Search suggested redactions’ table you can: 1. Click on one of the dropdowns (Redaction category, Page, Text), and select an option, or 2. Write text in the ‘Filter’ box just above the table. Click the blue box to apply the filter to the table.
Once you have filtered the table, or selected a row from the table, you have a few options underneath on what you can do with the filtered rows:
- Click the Exclude all redactions in table button to remove all redactions visible in the table from the document. Important: ensure that you have clicked the blue tick icon next to the search box before doing this to first filter the table, or you will remove all redactions from the document. If you do end up doing this, click the ‘Undo last element removal’ button below to restore the redactions.
- Click the Exclude specific redaction row button to remove only the redaction from the last row you clicked on from the document. The currently selected row is visible below.
- Click the Exclude all redactions with the same text as selected row button to remove all redactions from the document that are exactly the same as the selected row text.
NOTE: After excluding redactions using any of the above options, click the ‘Reset filters’ button below to ensure that the dropdowns and table return to seeing all remaining redactions in the document.
If you made a mistake, click the ‘Undo last element removal’ button to restore the Search suggested redactions table to its previous state (can only undo the last action).
Search text and redact
After a document has been processed, you may need to redact specific terms, names, or phrases that the automatic PII detection might have missed. The “Search text and redact” tab gives you the power to find and redact any text within your document manually.
Step 1: Search for Text
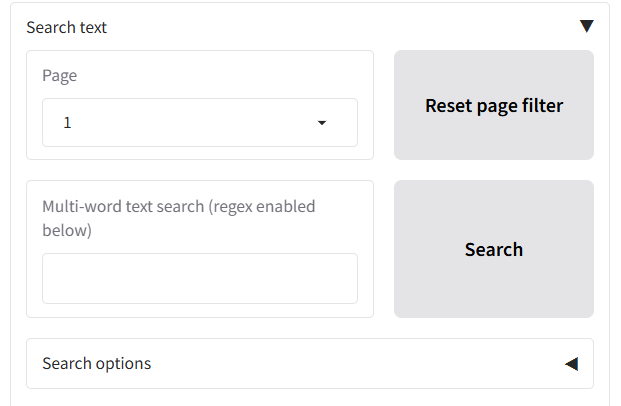
- Navigate to the “Search text and redact” tab to the right of the ‘Review redactions’ tab, under the ‘Apply redactions to PDF’ and ‘Save changes on current page to file’ buttons.
- The main table will initially be populated with all the text extracted from the document for a page, broken down by word. Use the page selector to view a specific page, or ‘ALL’ to see all words.
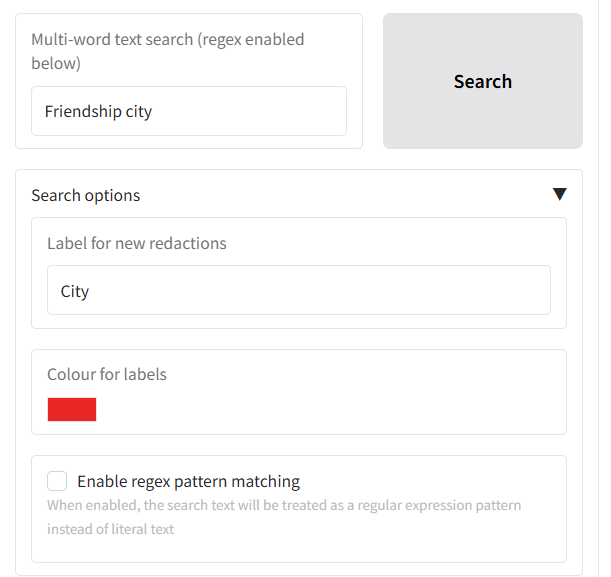
- To find specific words or phrases to redact, use the “Multi-word text search” box to type the word or phrase you want to find (this will search the whole document).
- If you want to do a regex-based search, tick the ‘Enable regex pattern matching’ box under ‘Search options’ below.
- Click the “Search” button or press Enter.
- The table below will update to show only the rows containing text that matches your search query.
Below the search button you can customise the appearance and label of the new redactions under the “Search options” accordion:
- Label for new redactions: Change the text that appears on the redaction box (default is “Redaction”). You could change this to “CONFIDENTIAL” or “CUSTOM”.
- Colour for labels: Set a custom color for the redaction boxes. You can use the colour picker interface that pops up to select a colour.
Tip: If you make a mistake during the search, to clear all filters and see the full text again, click the “Reset table to original state” button. You can also click the ‘Undo latest redaction’ button to remove the latest redaction item.
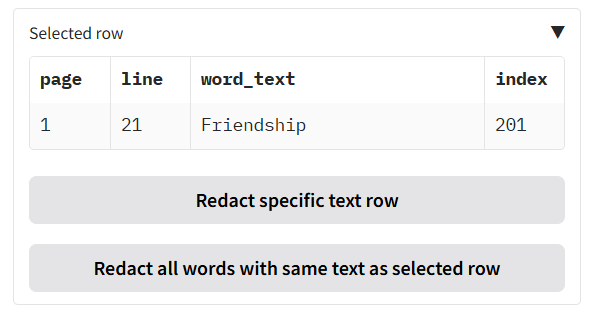
Step 2: Select and Review a Match
Your redaction search results will appear in the table underneath the search options, with each found word on a different row.
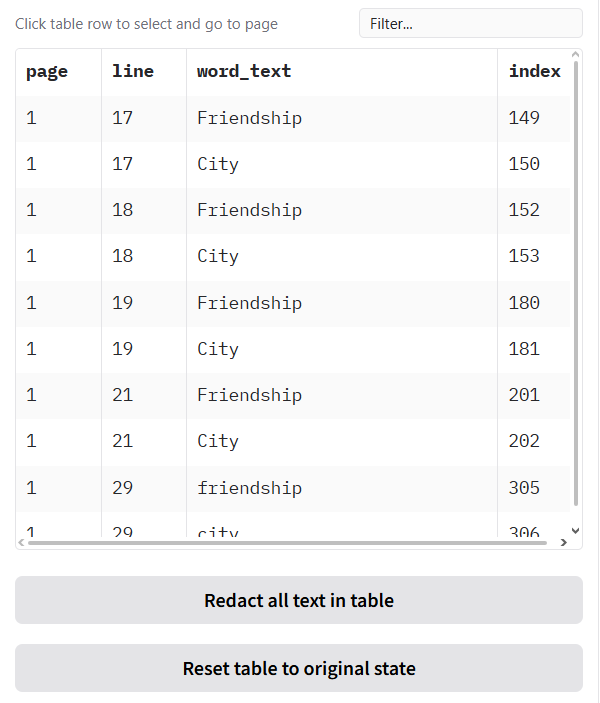
When you click on any row in the search results table:
- The document preview on the left will automatically jump to that page, allowing you to see the word in its original context.
- The details of your selection will appear in the smaller “Selected row” table for confirmation.
Step 3: Choose Your Redaction Method
You have several options for redacting the text you’ve found:
- Redact a single, specific instance of the phrase:
- Click on the exact row in the table you want to redact.
- Click the
Redact specific text rowbutton. - Only that single instance will be redacted.
- Redact all instances of a word/phrase:
- Let’s say you want to redact the project name “John Smith” everywhere it appears.
- Find and select one instance of “John Smith” in the table.
- Click the
Redact all words with same text as selected rowbutton. - The application will find and redact every single occurrence of “John Smith” throughout the entire document.
- Redact all current search results:
- Perform a search (e.g., for a specific person’s name).
- If you are confident that every result shown in the filtered table should be redacted, click the
Redact all text in tablebutton. - This will apply a redaction to all currently visible items in the table in one go, across all relevant pages in the document.
An example of the outputs you can see in the document view pane is shown below.
Undoing a Mistake
If you make a mistake, you can reverse the last redaction action you performed on this tab.
- Click the
Undo latest redactionbutton. This will revert the last set of redactions you added (whether it was a single row, all of a certain text, or all search results).
Important: This undo button only works for the most recent action. It maintains a single backup state, so it cannot undo actions that are two or more steps in the past.
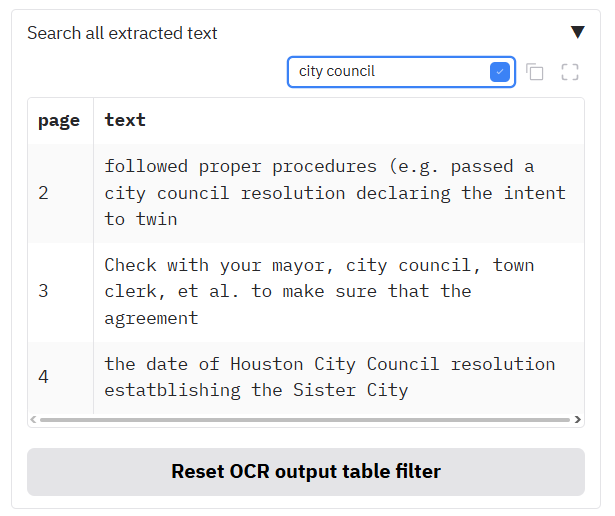
Navigating through the document using ‘View text’
The ‘View text’ table shows the text extracted from the document so you can check for correctness of the OCR process. If you have just completed a redaction task, you should see this table already filled in. If you have uploaded a ’…_ocr_output.csv’ file alongside a document file on the Review redactions tab as described above.
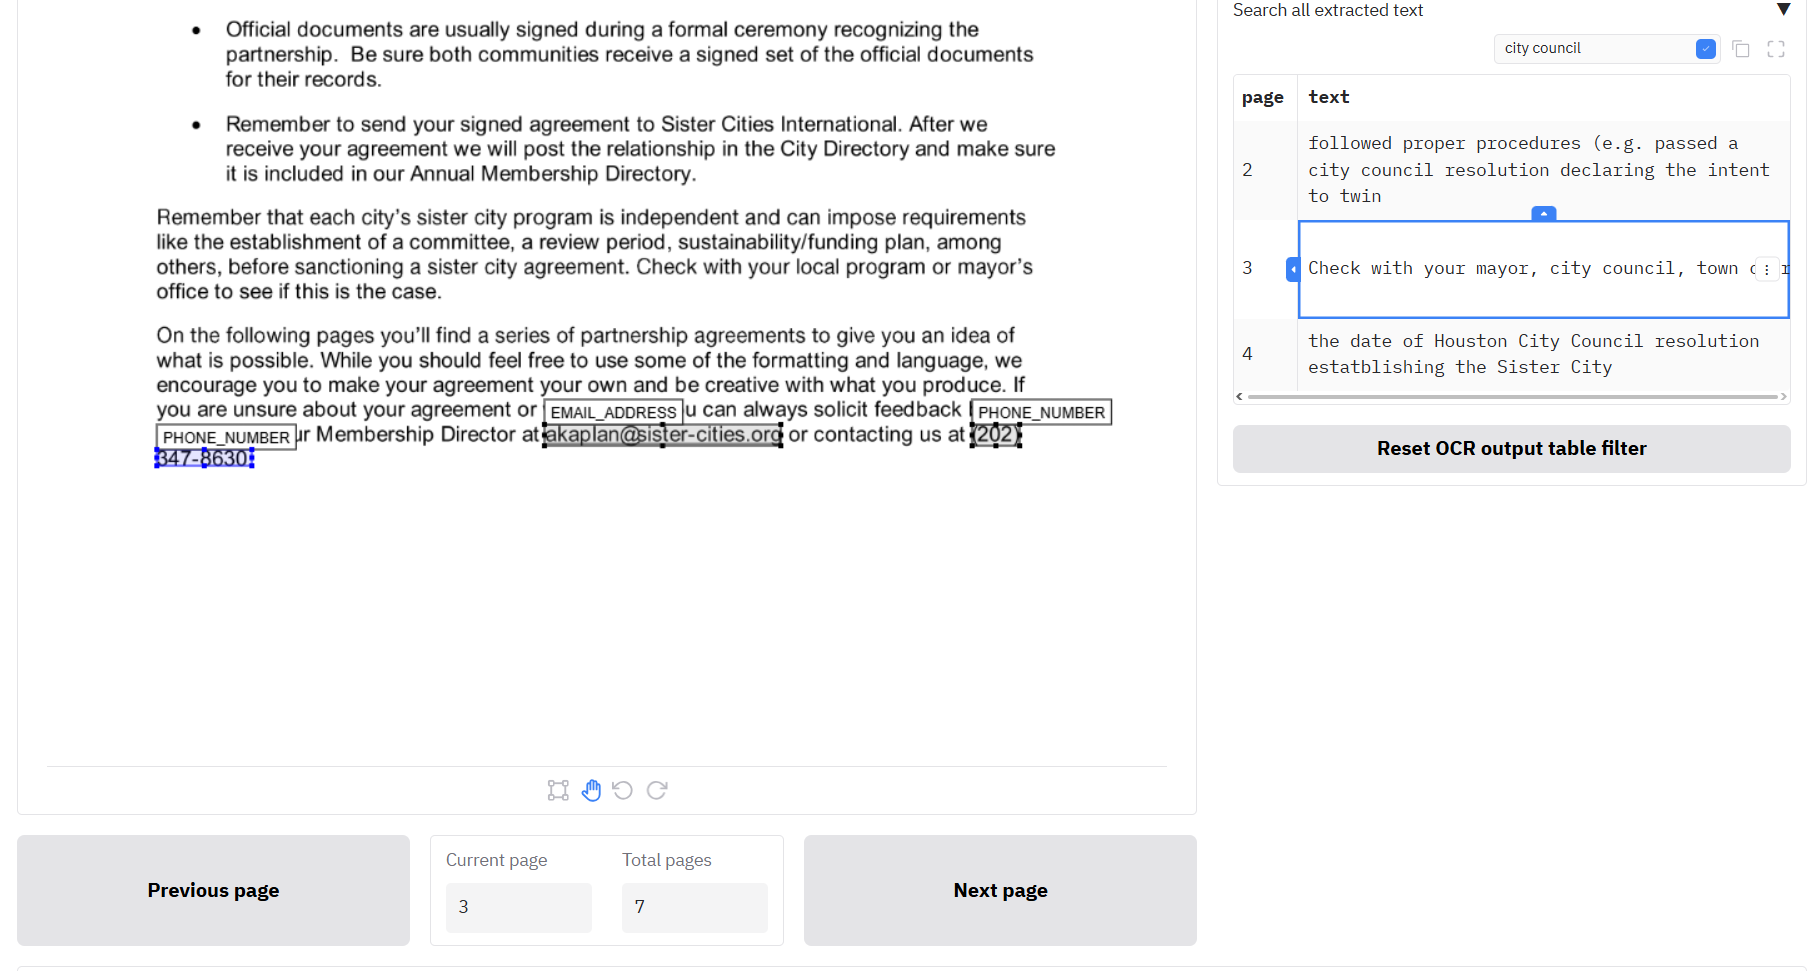
You can search through the extracted text by using the search bar just above the table. You can also filter specific columns by clicking on the three dots next to the column header and clicking ‘Filter’. When you click on a row, the Document viewer pane to the left will change to the selected page. To return the table to its original content, click the button below the table ‘Reset OCR output table filter’.
Apply revised redactions to PDF
Once you have reviewed all the redactions in your document and you are happy with the outputs, you can click ‘Apply revised redactions to PDF’ to create a new ’_redacted.pdf’ and ’_redactions_for_review.pdf’ outputs.

Loading in previous results to continue redaction
You may want to return to the same document later to modify existing redactions and add new ones. In this case, especially for large documents, you do not want to waste the time and expense to redo the redaction task from scratch. The Redaction app allows you to load in previous redaction results so you can continue from where you left off.
Loading in previous results from the _redactions_for_review.pdf file
The redaction process produces a file with the suffix ’_redactions_for_review.pdf’, which contains all the redaction information needed to reuse in the app, and is also suitable for continuing with redactions in Adobe Acrobat.
To continue with a file previously redacted, import your ‘redactions_for_review.pdf’ file on the ‘Review redactions’ tab in the first file input box. Once your file is uploaded, you should see the first page of the document appear in the Document view pane below, and under the ‘Modify redactions’ tab to the right, you should see the table filled in with details of the previous redactions.
Merging previous redaction review files
Say you have done multiple redaction tasks with the same file, and you want to merge all the redaction boxes together into one combined review document. You can merge multiple output ‘redactions for review.pdf’ files using the interface on the Settings page under ‘Combine multiple review PDFs or CSV files’.
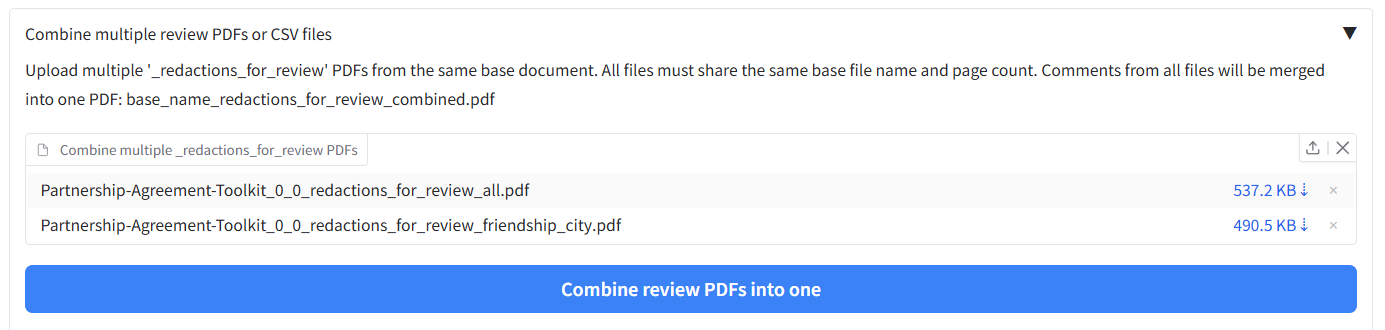
In the file input box, upload your multiple ‘redactions_for_review.pdf’ files, then click ‘Combine multiple review PDFs into one’. You should then get out a combined file that contains all the redaction boxes from the input files. You can then upload this file into the file input on the ‘Review redactions’ tab to review and modify redactions as detailed above.

Loading in OCR results to search for new redactions
When loading in results following the above method, you will notice that the table under ‘Search text and redact’ is still empty. To use this feature we need to load in the OCR results from your previous redaction task.
When you redact a document, one of the outputs has the suffix ‘ocr_results_with_words.csv’. It’s this file that we need to upload to be able to search for new redactions. To do this, find the relevant ocr_results_with_words.csv file, and upload it into the second upload box on the ‘Review redactions’ tab in the top right (labelled 2.). When you do this, you should see the ‘Search text and redact’ tab table filled in with data. The table under the ‘View text’ tab should also be filled in.

Using a previous OCR results file to skip redoing OCR for future redaction tasks
If you have a large document that you want to redact a second time in future, you can save time and money by retaining output files from the first run, and uploading them alongside the document next time you use the app for redaction.
Every time you redact, a file with the suffix ‘.json’ is produced. This file contains all the OCR results from your analysis. To use this file next time and skip waiting and paying for the OCR process, you can upload this alongside your document. On the ‘Redact PDFs/images’ tab, the file input area allows you to upload multiple files at the same time. With your document file and the .json file in the same folder, click on Drop files here or click to upload, and select both the PDF file and the .json file from the previous analysis output. The app should load both in.
To check the previous OCR result upload has been successful, lower down the page you should see two checkboxes, called ‘Existing Textract output file found’ and ‘Existing local OCR output found’. If one of these has become checked, then the OCR output has been successfully uploaded. When you next redact the document with the given method, it should load in the existing OCR results to skip re-analysis.
Exporting page visualisations (Review redactions tab)
Under the page viewer on the Review redactions tab there is an accordion that lets you export helpful single-page images so you can easily review the current OCR and redaction outputs for each page:
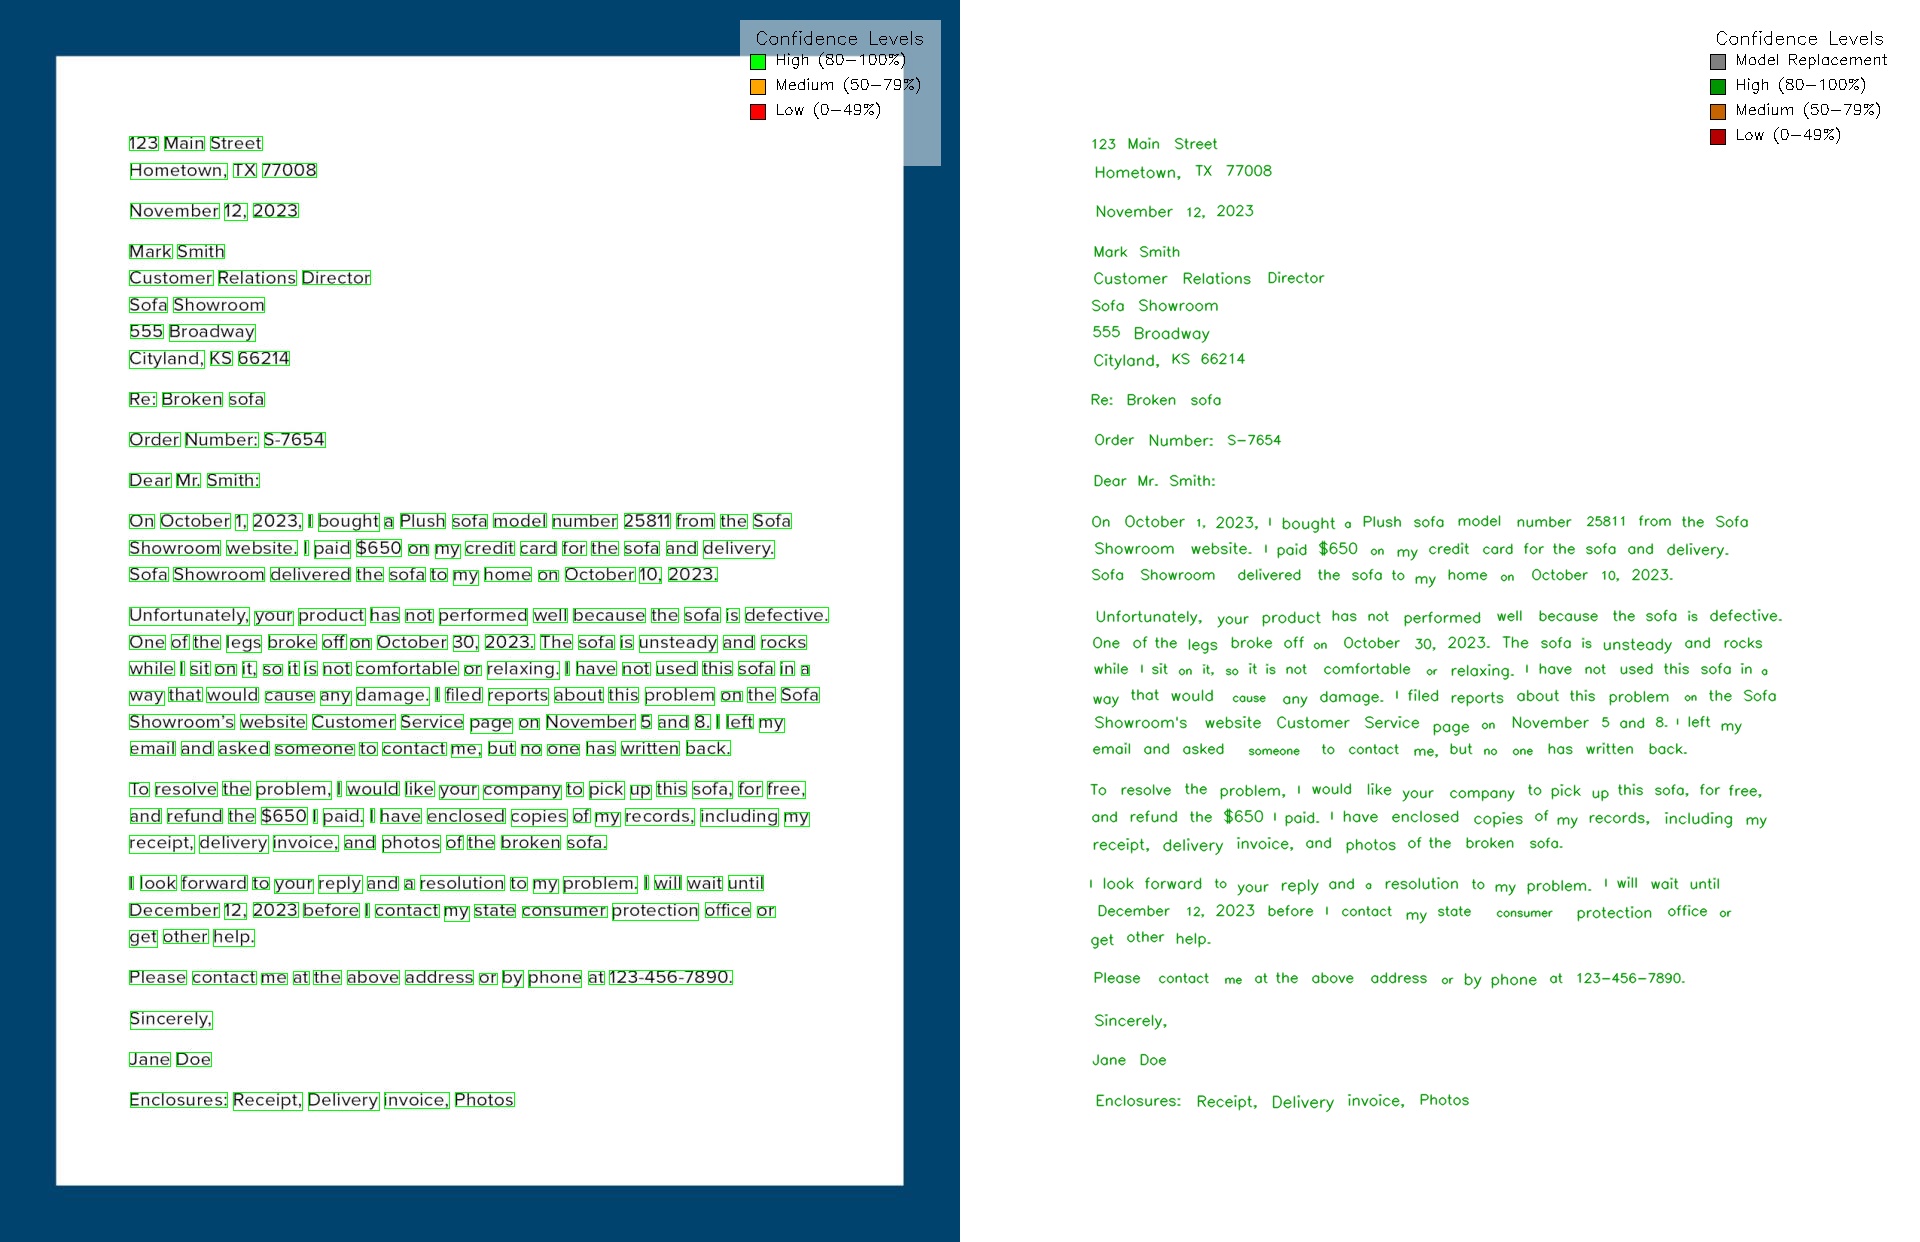
- Export OCR visualisation image: saves a PNG showing word-level OCR bounding boxes and confidence colouring (plus legend), using the OCR results loaded for the document.
- Export redaction overlay image: saves a JPEG of the current page image with redaction box outlines (colour/line style by label) plus a legend in the top-right.
Both exports write into your output folder:
- Redaction overlay:
redaction_overlay/(e.g.*_redaction_overlay.jpg) - OCR visualisation:
review_ocr_visualisations/(e.g.*_review_ocr_visualisations.png)
Document summarisation
When summarisation is enabled, a Document summarisation tab is shown in the app. It lets you generate LLM-based summaries from PDFs, or from OCR output CSVs (e.g. from a previous redaction run).
Here is how you can summarise a document:
- Upload Files: * 1.a Upload PDF files: In the summarisation tab, use “Upload one or multiple PDF files to summarise” to attach one or more PDF files, or
- 1.b Upload OCR output files: In the summarisation tab, use “Upload one or multiple ‘ocr_output.csv’ files to summarise” to attach one or more
*_ocr_output.csvfiles.
- 1.b Upload OCR output files: In the summarisation tab, use “Upload one or multiple ‘ocr_output.csv’ files to summarise” to attach one or more
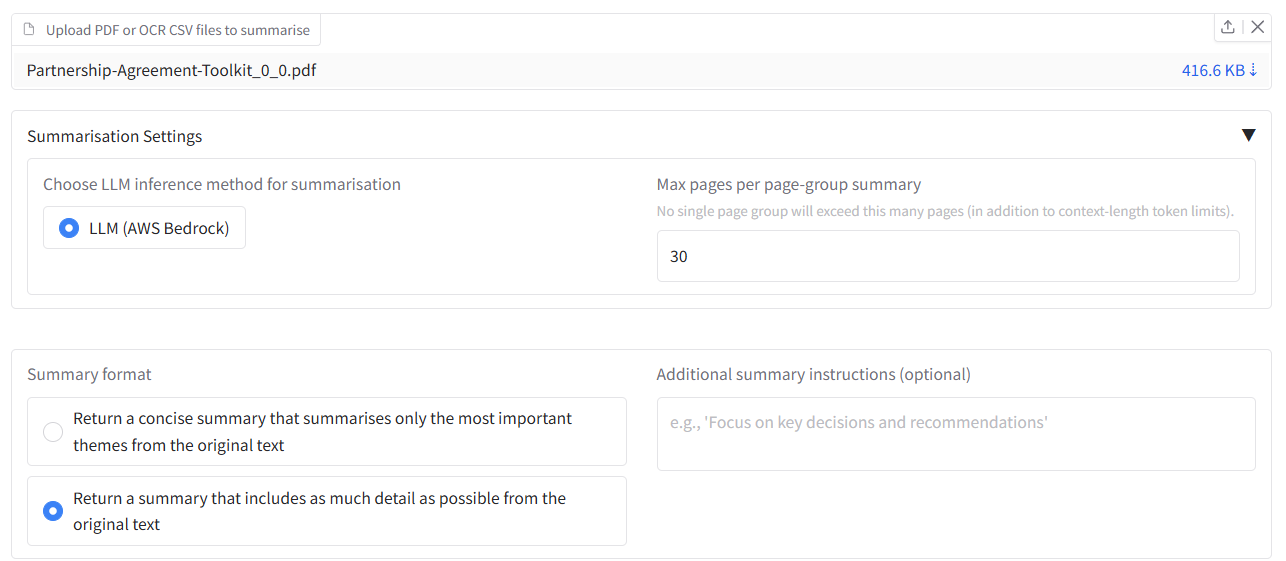
- Summarisation settings (accordion):
- Choose LLM inference method for summarisation: Choose from the LLM options available in the app settings.
- Max pages per page-group summary: Limits how many pages are summarised together.
- Summary format: Concise or Detailed.
- Additional summary instructions (optional): e.g. “Focus on key obligations.”
- Generate summary: Click “Generate summary” to run the summarisation.
- Outputs: When finished, you can download summary files and view the summary that appears below.

Redacting Word, tabular data files (XLSX/CSV) or open text
Word or tabular data files (XLSX/CSV)
The app can be used to redact Word (.docx), or tabular data files such as XLSX or CSV files. For redaction with tabular files to work properly, your data file (CSV, Excel) needs to be in a simple table format, with a single table starting from the first cell (A1), and no other information in the sheet. Similarly for XLSX files, each sheet in the file that you want to redact should be in this simple format.
To demonstrate this, we can use the example csv file ‘combined_case_notes.csv’, which is a small dataset of dummy social care case notes. Go to the ‘Open text or Excel/csv files’ tab. Drop the file into the upload area. After the file is loaded, you should see the suggested columns for redaction in the box underneath. You can select and deselect columns to redact as you wish from this list.
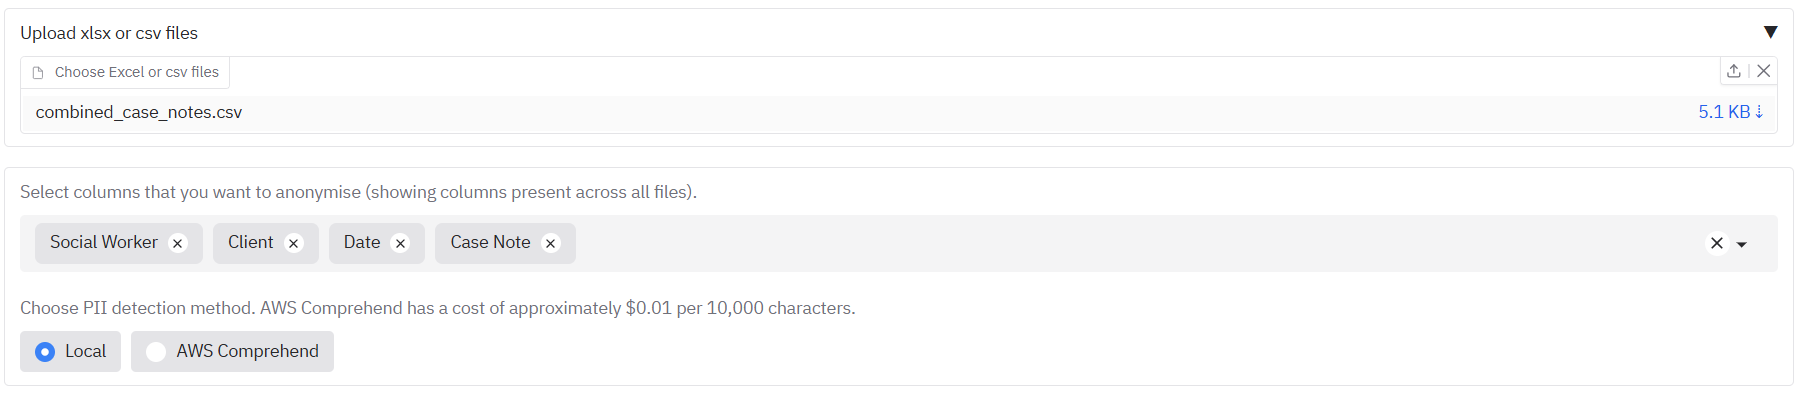
If you were instead to upload an XLSX file, you would see also a list of all the sheets in the XLSX file that can be redacted. The ‘Select columns’ area underneath will suggest a list of all columns in the file across all sheets.

Once you have chosen your input file and data, you can choose the redaction method. If visible, ‘Local’ will use a small local model, which is the same as that used for documents on the ‘Redact PDFs/images’ tab. ‘AWS Comprehend’ will give better results, at a slight cost.
When you click Redact text/data files, you will see the progress of the redaction task by file and sheet, and you will receive a CSV output with the redacted data.
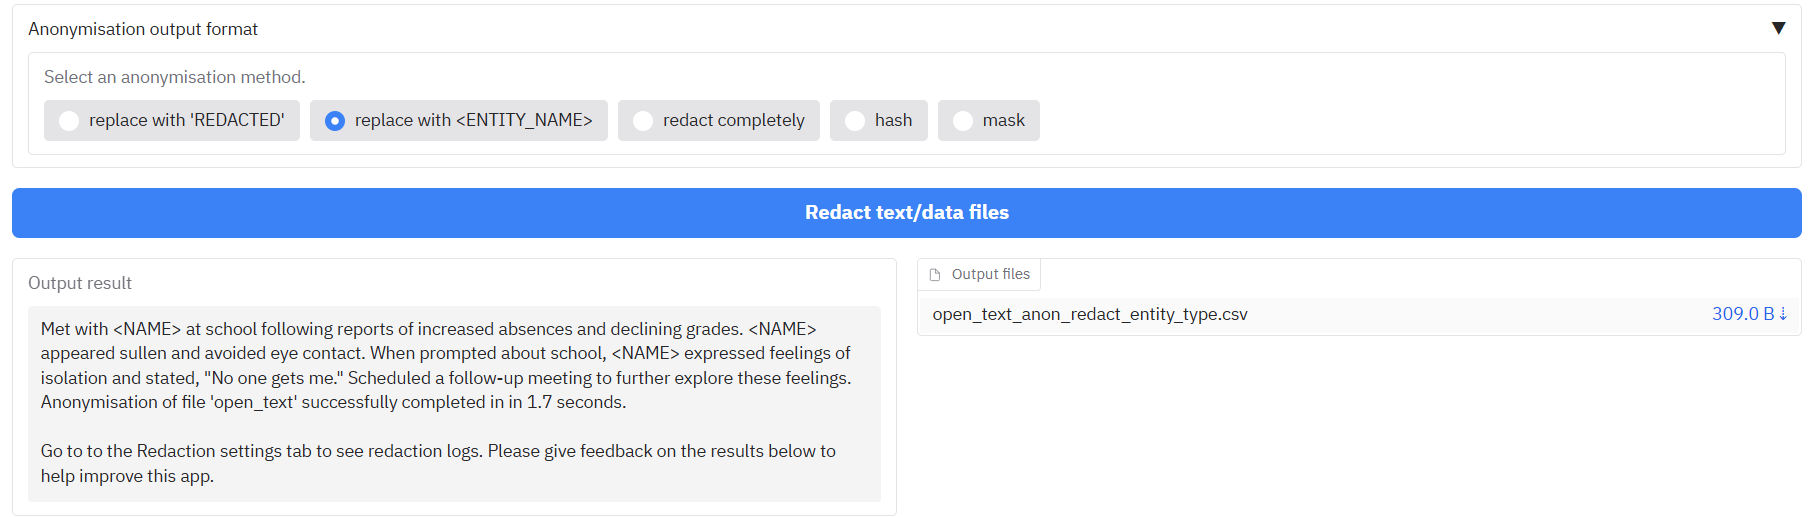
Choosing output anonymisation format
You can also choose the anonymisation format of your output results. Open the tab ‘Anonymisation output format’ to see the options. By default, any detected PII will be replaced with the word ‘REDACTED’ in the cell. You can choose one of the following options as the form of replacement for the redacted text:
- replace with ‘REDACTED’: Replaced by the word ‘REDACTED’ (default)
- replace with
: Replaced by e.g. ‘PERSON’ for people, ‘EMAIL_ADDRESS’ for emails etc. - redact completely: Text is removed completely and replaced by nothing.
- hash: Replaced by a unique long ID code that is consistent with entity text. I.e. a particular name will always have the same ID code.
- mask: Replace with stars ’*’.

Redacting open text
You can also write open text into an input box and redact that using the same methods as described above. To do this, write or paste text into the ‘Enter open text’ box that appears when you open the ‘Redact open text’ tab. Then select a redaction method, and an anonymisation output format as described above. The redacted text will be printed in the output textbox, and will also be saved to a simple CSV file in the output file box.
You can test this by copy and pasting the text “John Smith is a person” into the input box, and selecting the replace with ‘REDACTED’ option. After pressing Redact text/data files, you should see the text “REDACTED” in the output textbox, and a csv file with the redacted text in the output file box.
Redaction log outputs
A list of the suggested redaction outputs from tabular data / Word/ open text data redaction is also provided in the output box with the name ’…_log.csv’. This file gives a tabular breakdown of the specific redactions applied, the entity type, position, and underlying text.
Advanced user guide
If the default settings and options for redaction are not sufficient for your needs, you can adjust the settings following the guide below.
Identifying and redacting duplicate pages with custom settings
Simple redaction of duplicate pages using the checkbox on the ‘Redact PDFs/images’ tab during initial redaction is described here. If the default settings are not sufficient for your needs, or if you want to identify duplicate lines of text or passages, you can adjust the settings following the guide below.
The files for this section are stored here.
Some redaction tasks involve removing duplicate pages of text that may exist across multiple documents. This feature helps you find and remove duplicate content that may exist in single or multiple documents. It can identify everything from single identical pages to multi-page sections (subdocuments). The process involves three main steps: configuring the analysis, reviewing the results in the interactive interface, and then using the generated files to perform the redactions.
Duplicate page detection in documents
This section covers finding duplicate pages across PDF documents using OCR output files. For a quick introduction to this functionality, you could run one of the following examples:
For duplicate page detection: On the ‘Identify duplicate pages’ tab, you’ll find examples for finding duplicate content in documents:
- Find duplicate pages of text in document OCR outputs - Uses page-level analysis with a similarity threshold of 0.95 and minimum word count of 10
- Find duplicate text lines in document OCR outputs - Uses line-level analysis with a similarity threshold of 0.95 and minimum word count of 3
Once you have clicked on an example, you can click the ‘Identify duplicate pages/subdocuments’ button to load the example into the app and find duplicate content.

Step 1: Upload and Configure the Analysis First, navigate to the ‘Identify duplicate pages’ tab. In ‘Step 1: Configure and run analysis’, upload all the ocr_output.csv files you wish to compare. These files are generated every time you run a redaction task and contain the text for each page of a document.
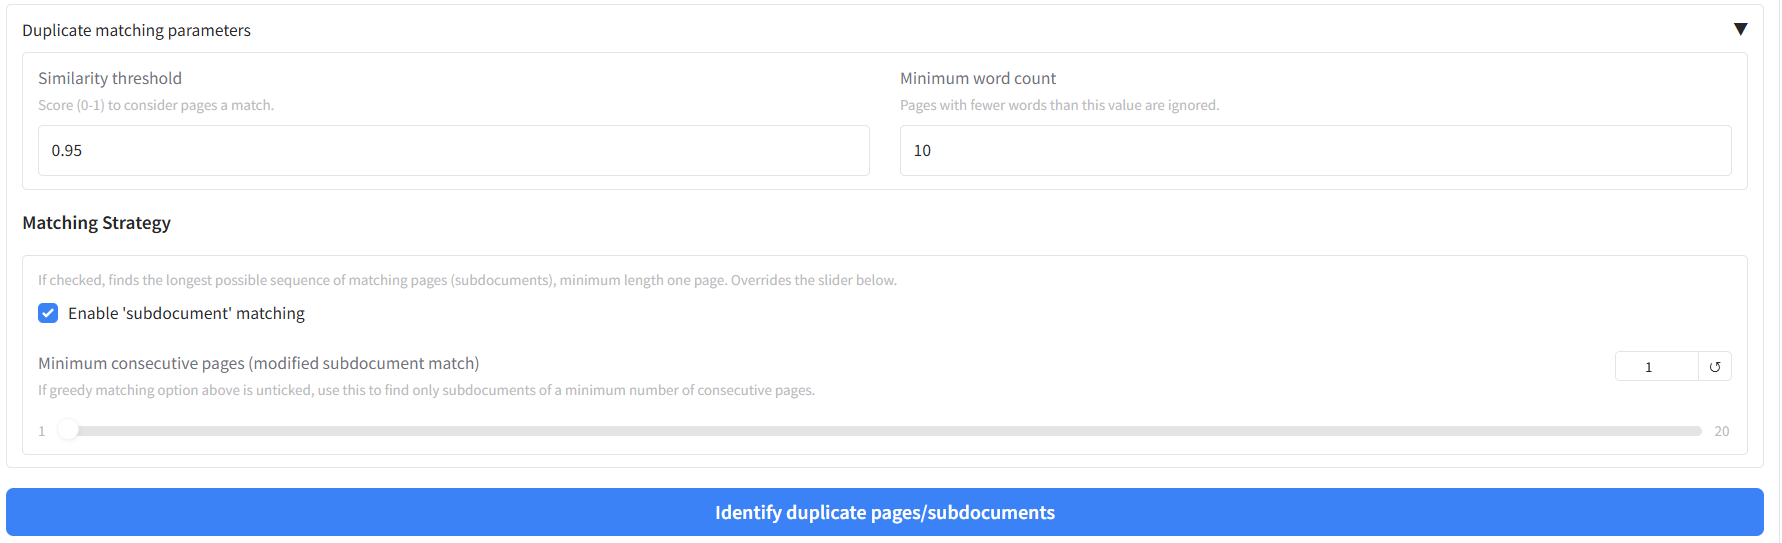
For our example, you can upload the four ‘ocr_output.csv’ files provided in the example folder. Open the ‘Duplicate matching parameters’ accordion to set:
- Similarity threshold: A score from 0 to 1. Pages or sequences with text similarity above this value are considered a match (default 0.95).
- Minimum word count: Pages or lines with fewer words than this are ignored (default 10).
- Duplicate matching mode: ‘Find duplicates by page’ compares full-page text; ‘Find duplicates by text line’ compares individual lines.
Matching strategy (below the parameters): - ‘Combine consecutive matches into a single match (subdocument match)’ (default: checked): Finds the longest possible sequence of matching pages (subdocuments). Uncheck to use the next option. - Minimum consecutive matches (slider, shown when subdocument matching is unchecked): Only report sequences of at least this many consecutive matches (e.g. 3 for at least 3-page runs). Set to 1 for single-page matching.
Once your parameters are set, click ‘Identify duplicate pages/subdocuments’.
In case you want to see the original PDFs for the example, they are available here.
Step 2: Review Results in the Interface After the analysis is complete, the results will be displayed directly in the interface.
Analysis Summary: A table will appear showing a summary of all the matches found. The columns will change depending on the matching strategy you chose. For subdocument matches, it will show the start and end pages of the matched sequence.
Interactive Preview: This is the most important part of the review process. Click on any row in the summary table. The full text of the matching page(s) will appear side-by-side in the “Full Text Preview” section below, allowing you to instantly verify the accuracy of the match.

Step 3: Download and Use the Output Files The analysis also generates a set of downloadable files for your records and for performing redactions.
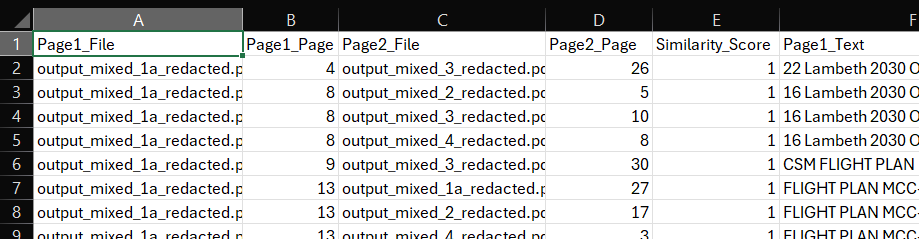
- page_similarity_results.csv: This is a detailed report of the analysis you just ran. It shows a breakdown of the pages from each file that are most similar to each other above the similarity threshold. You can compare the text in the two columns ‘Page_1_Text’ and ‘Page_2_Text’. For single-page matches, it will list each pair of matching pages. For subdocument matches, it will list the start and end pages of each matched sequence, along with the total length of the match.
- [Original_Filename]_pages_to_redact.csv: For each input document that was found to contain duplicate content, a separate redaction list is created. This is a simple, one-column CSV file containing a list of all page numbers that should be removed. To use these files, you can either upload the original document (i.e. the PDF) on the ‘Review redactions’ tab, and then click on the ‘Apply relevant duplicate page output to document currently under review’ button. You should see the whole pages suggested for redaction on the ‘Review redactions’ tab. Alternatively, you can reupload the file into the whole page redaction section as described in the ‘Full page redaction list example’ section.

If you want to combine the results from this redaction process with previous redaction tasks for the same PDF, you could merge review file outputs following the steps described in Merging existing redaction review files above.
Redact duplicate pages on the Redact PDFs/images tab
On the ‘Redact PDFs/images’ tab, in the ‘Redaction settings’ area (accordion ‘Terms to always include or exclude in redactions, and whole page redaction’), there is a ‘Redact duplicate pages’ checkbox. When this is enabled, the app will identify duplicate pages and apply whole-page redaction to them as part of the same redaction run. This option is shown when PII identification options are enabled. You can use it instead of (or in addition to) running duplicate detection on the ‘Identify duplicate pages’ tab and then applying the output to a document on ‘Review redactions’.
Duplicate detection in tabular data
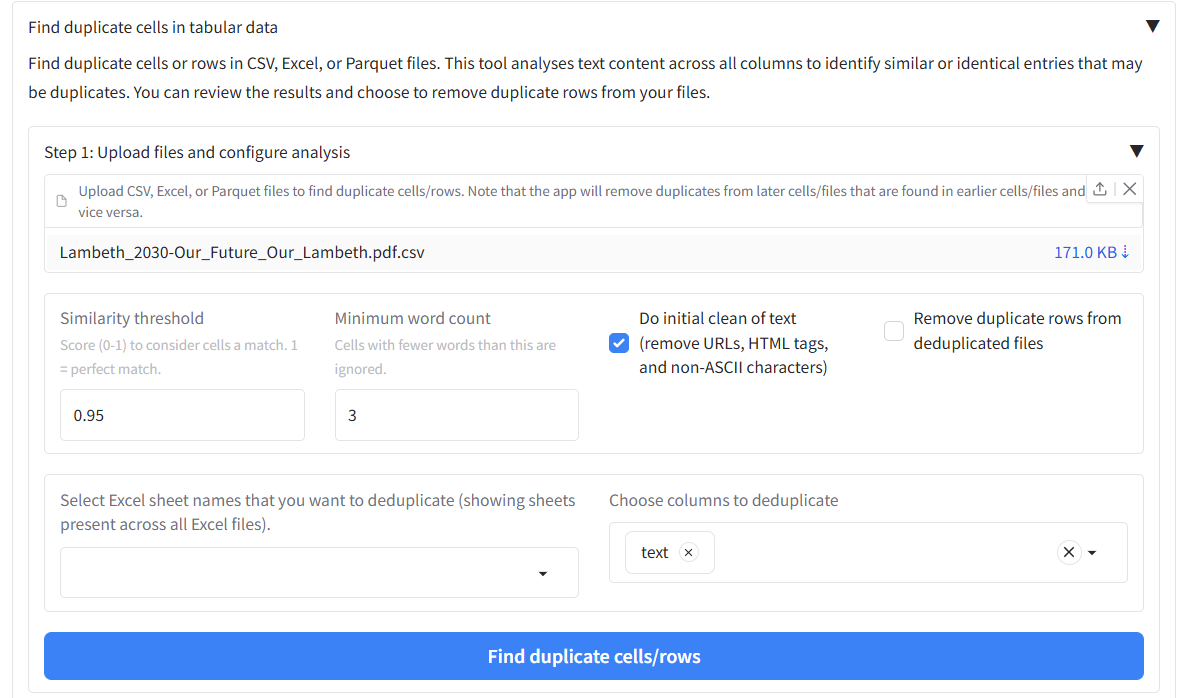
The app also includes functionality to find duplicate cells or rows in CSV, Excel, or Parquet files. This is particularly useful for cleaning datasets where you need to identify and remove duplicate entries.
Step 1: Upload files and configure analysis
Navigate to the ‘Word or Excel/CSV files’ tab and scroll down to the “Find duplicate cells in tabular data” section. Upload your tabular files (CSV, Excel, or Parquet) and configure the analysis parameters:
- Similarity threshold: Score (0-1) to consider cells a match. 1 = perfect match
- Minimum word count: Cells with fewer words than this value are ignored
- Do initial clean of text: Remove URLs, HTML tags, and non-ASCII characters
- Remove duplicate rows: Automatically remove duplicate rows from deduplicated files
- Select Excel sheet names: Choose which sheets to analyze (for Excel files)
- Select text columns: Choose which columns contain text to analyze
Step 2: Review results
After clicking “Find duplicate cells/rows”, the results will be displayed in a table showing: - File1, Row1, File2, Row2 - Similarity_Score - Text1, Text2 (the actual text content being compared)
Click on any row to see more details about the duplicate match in the preview boxes below.
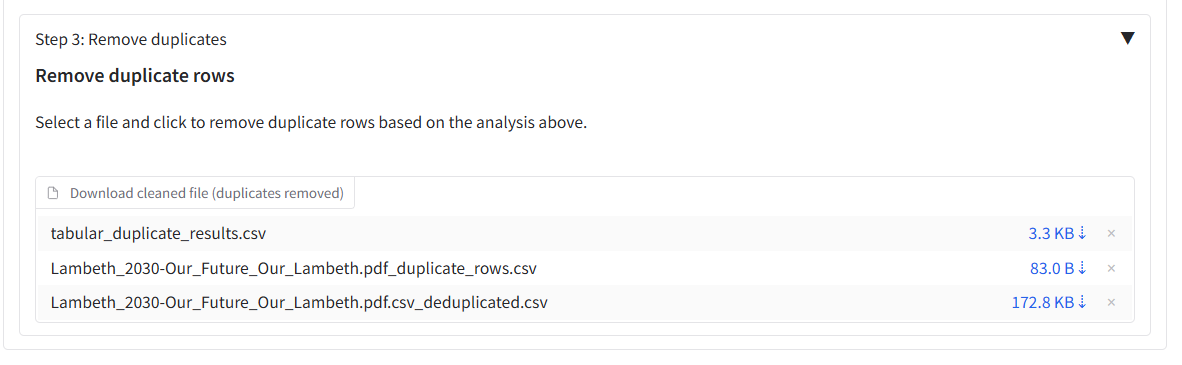
Step 3: Remove duplicates
The deduplicated output files will be available for download in the output box. If you have selected ‘Remove duplicate rows from deduplicated files’, the duplicate rows will be removed from the deduplicated files. If not, then the duplicate rows will be indicated in the output files in the column named ‘duplicated’, which can be TRUE or FALSE.
Export redacted document files to Adobe Acrobat
Files for this section are stored here.
The Document Redaction app has enhanced features for working with Adobe Acrobat. You can now export suggested redactions to Adobe, import Adobe comment files into the app, and use the new redactions_for_review.pdf files directly in Adobe Acrobat.
Using redactions_for_review.pdf files with Adobe Acrobat
The app now generates redactions_for_review.pdf files that contain the original PDF with redaction boxes overlaid but the original text still visible underneath. These files are specifically designed for use in Adobe Acrobat and other PDF viewers where you can:
- See the suggested redactions without the text being permanently removed
- Review redactions before finalising them
- Use Adobe Acrobat’s built-in redaction tools to modify or apply the redactions
- Export the final redacted version directly from Adobe
Simply open the redactions_for_review.pdf file in Adobe Acrobat to begin reviewing and modifying the suggested redactions.
Exporting comment files to Adobe Acrobat
To convert suggested redactions to Adobe format in the format of xfdf comment files, you need to have the original PDF and a review file csv in the input box at the top of the Review redactions page.

Then, you can find the export to Adobe option at the bottom of the Review redactions tab. Adobe comment files will be output here.

Once the input files are ready, you can click on the ‘Convert review file to Adobe comment format’. You should see a file appear in the output box with a ‘.xfdf’ file type. To use this in Adobe, after download to your computer, you should be able to double click on it, and a pop-up box will appear asking you to find the PDF file associated with it. Find the original PDF file used for your redaction task. The file should be opened up in Adobe Acrobat with the suggested redactions.
Importing comment files from Adobe Acrobat
The app also allows you to import .xfdf files from Adobe Acrobat. To do this, go to the same Adobe import/export area as described above at the bottom of the Review Redactions tab. In this box, you need to upload a .xfdf Adobe comment file, along with the relevant original PDF for redaction.

When you click the ‘convert .xfdf comment file to review_file.csv’ button, the app should take you up to the top of the screen where the new review file has been created and can be downloaded.

Submit documents to the AWS Textract API service for faster OCR
If enabled by your administrator, an accordion ‘Submit whole document to AWS Textract API (quickest text extraction for large documents)’ appears on the ‘Redact PDFs/images’ tab. This sends whole documents to Textract for fast extraction, separate from the main redaction flow. For very large documents, this can be a significant time saver in getting your OCR results, which you can then use for redaction tasks in the app.
Starting a new Textract API job
To use this feature, first upload a document file in the usual way on the ‘Redact PDFs/images’ tab. Under ‘Enable AWS Textract signature detection’ (inside ‘Change default redaction settings’) you can choose whether to analyse signatures or not (with a cost implication).
Then, open the section under the heading ‘Submit whole document to AWS Textract API…’.
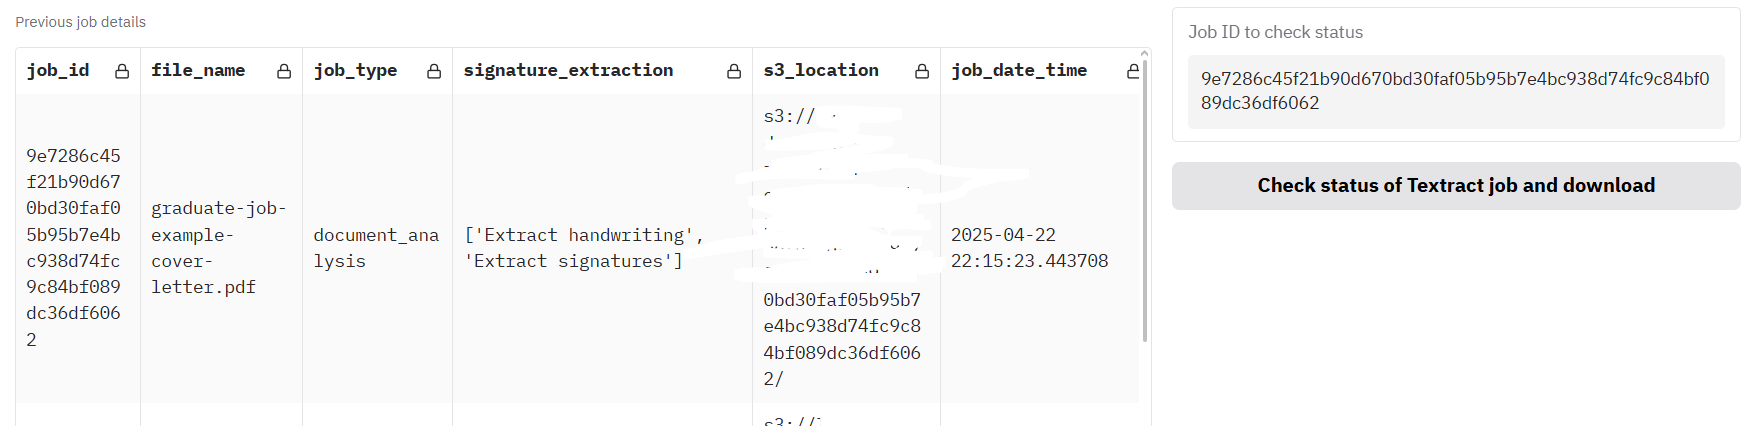
Click ‘Analyse document with AWS Textract API call’. After a few seconds, the job should be submitted to the AWS Textract service. The box ‘Job ID to check status’ should now have an ID filled in. If it is not already filled with previous jobs (up to seven days old), the table should have a row added with details of the new API job.
Click the button underneath, ‘Check status of Textract job and download’, to see progress on the job. Processing will continue in the background until the job is ready, so it is worth periodically clicking this button to see if the outputs are ready. In testing, and as a rough estimate, it seems like this process takes about five seconds per page. However, this has not been tested with very large documents. Once ready, the ’_textract.json’ output should appear below.
Textract API job outputs
The ’_textract.json’ output can be used to speed up further redaction tasks as described previously, the ‘Existing Textract output file found’ flag should now be ticked.

You can now easily get the ’…_ocr_output.csv’ redaction output based on this ’_textract.json’ (described in Redaction outputs) by clicking on the button ‘Convert Textract job outputs to OCR results’. You can now use this file e.g. for identifying duplicate pages, or for redaction review.
Advanced OCR settings - Efficient OCR, overwrite existing OCR
On the Settings tab you may see a section called ‘Advanced OCR settings’. Here you may see a few options.
Efficient OCR
When checked, redaction tasks will first check all pages for text that can be extracted simply without needing to analyse with the OCR model. If there are more words on the page than the value shown in ‘Minimum words for efficient OCR’, the app will follow this simple extraction process, and only run the more expensive OCR process for the remaining pages.
This field ‘Min. page-area fraction for an embedded image to force OCR’ is shown when Efficient OCR is enabled. It sets the smallest fraction of the page area (on the PDF page) that a single embedded image must cover—on one placement on the page—for that page to be sent through the full OCR step even if the page already has enough extractable words for the text-only path. That way, pages with plenty of selectable text but a large image (for example a photo or embedded scan) can still be analysed by OCR, which can pick up text that exists only inside the image and is not separate selectable text.
Values are typically small decimals (for example 0.01 for 1% of the page area). Enter 0 to turn off this rule: routing then depends only on the minimum word count (the label in the app notes this as “word count only”). To disable Efficient OCR entirely, uncheck the ‘Efficient OCR’ checkbox and run your redaction task.
Note: AWS Textract with Extract signatures still analyses all pages and disables Efficient OCR for that workflow.
Overwrite existing OCR results
When checked, redaction tasks will overwrite any existing OCR results with the new results. This is useful if you have already run a redaction task and you want to re-run it with a different method or settings. To disable this feature, simply uncheck the ‘Overwrite existing OCR results’ checkbox and run your redaction task.
High-quality Textract OCR
This option may not be visible unless you system administrator has enabled it. When checked, redaction tasks will use a hybrid approach to OCR. This will first use the relatively efficient Textract OCR process to extract text, and then use the more expensive Vision Language Model (VLM) OCR process to extract any text that was missed by the efficient OCR process. This is useful if you have a document that is a mix of text and images, and you want to ensure that all text is extracted. To disable this feature, simply uncheck the ‘High quality Textract OCR’ checkbox and run your redaction task.
Save page OCR visualisations
When checked, redaction tasks will save page OCR visualisations to the output folder. This is useful for debugging and to see the OCR results for each page. The visualisations will be saved as ’_page_ocr_visualisations.png’ files in the output folder. To disable this feature, simply uncheck the ‘Save page OCR visualisations’ checkbox and run your redaction task.
Modifying existing redaction review files
You can find the folder containing the files discussed in this section here.
As well as serving as inputs to the document redaction app’s review function, the ‘review_file.csv’ output can be modified insider or outside of the app. This gives you the flexibility to change redaction details outside of the app.
If you open up a ‘review_file’ csv output using a spreadsheet software program such as Microsoft Excel you can easily modify redaction properties. Open the file ‘Partnership-Agreement-Toolkit_0_0_redacted.pdf_review_file_local.csv’, and you should see a spreadshet with just four suggested redactions (see below). The following instructions are for using Excel.
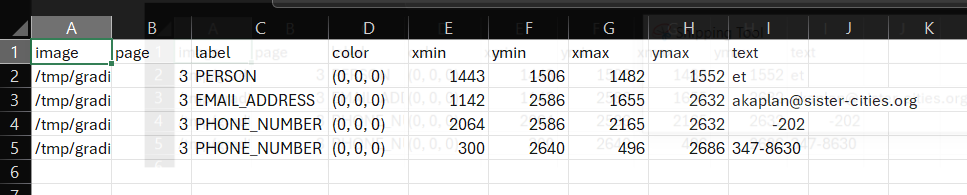
The first thing we can do is remove the first row - ‘et’ is suggested as a person, but is obviously not a genuine instance of personal information. Right click on the row number and select delete on this menu. Next, let’s imagine that what the app identified as a ‘phone number’ was in fact another type of number and so we wanted to change the label. Simply click on the relevant label cells, let’s change it to ‘SECURITY_NUMBER’. You could also use ‘Find & Select’ -> ‘Replace’ from the top ribbon menu if you wanted to change a number of labels simultaneously.
How about we wanted to change the colour of the ‘email address’ entry on the redaction review tab of the redaction app? The colours in a review file are based on an RGB scale with three numbers ranging from 0-255. You can find suitable colours here. Using this scale, if I wanted my review box to be pure blue, I can change the cell value to (0,0,255).
Imagine that a redaction box was slightly too small, and I didn’t want to use the in-app options to change the size. In the review file csv, we can modify e.g. the ymin and ymax values for any box to increase the extent of the redaction box. For the ‘email address’ entry, let’s decrease ymin by 5, and increase ymax by 5.
I have saved an output file following the above steps as ‘Partnership-Agreement-Toolkit_0_0_redacted.pdf_review_file_local_mod.csv’ in the same folder that the original was found. Let’s upload this file to the app along with the original pdf to see how the redactions look now.
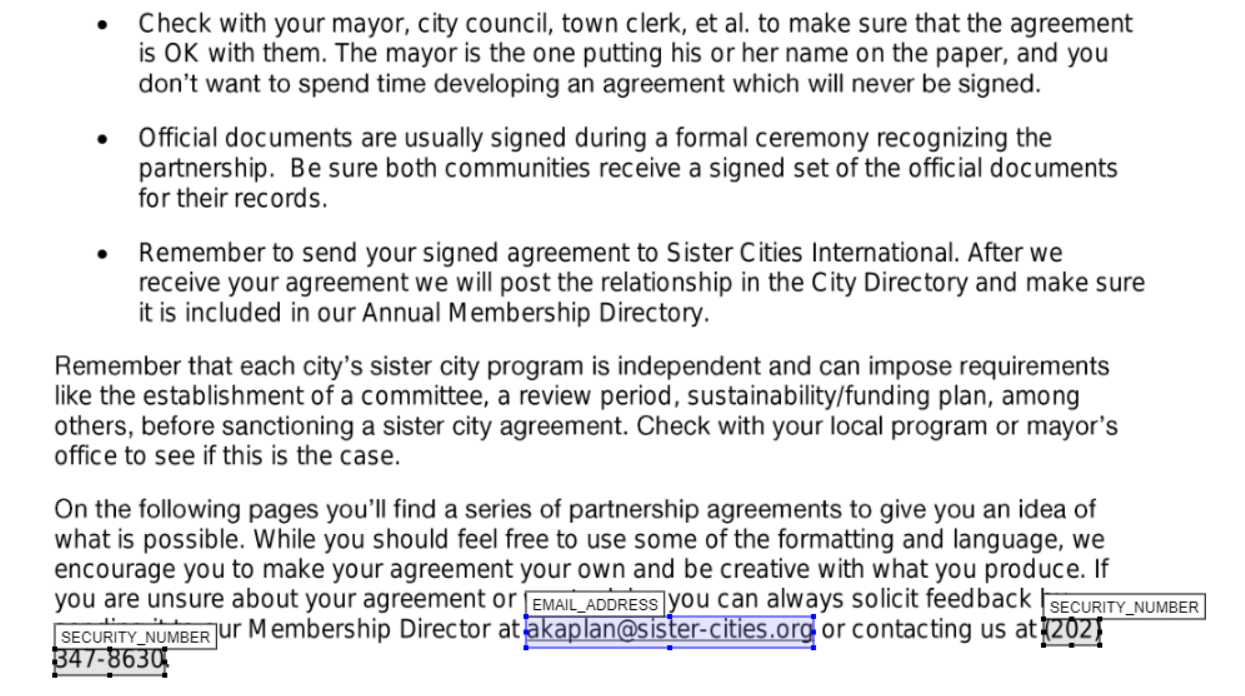
We can see from the above that we have successfully removed a redaction box, changed labels, colours, and redaction box sizes.
Features for expert users/system administrators
This advanced user guide covers features that require system administration access or command-line usage. These options are not enabled by default but can be configured by your system administrator, and are not available to users who are just using the graphical user interface. These features are typically used by system administrators or advanced users who need more control over the redaction process.
Using AWS Textract and Comprehend when not running in an AWS environment
AWS Textract and Comprehend give much better results for text extraction and document redaction than the local model options in the app. The most secure way to access them in the Redaction app is to run the app in a secure AWS environment with relevant permissions. Alternatively, you could run the app on your own system while logged in to AWS SSO with relevant permissions.
However, it is possible to access these services directly via API from outside an AWS environment by creating IAM users and access keys with relevant permissions to access AWS Textract and Comprehend services. Please check with your IT and data security teams that this approach is acceptable for your data before trying the following approaches.
To do the following, in your AWS environment you will need to create a new user with permissions for “textract:AnalyzeDocument”, “textract:DetectDocumentText”, and “comprehend:DetectPiiEntities”. Under security credentials, create new access keys - note down the access key and secret key.
Direct access by passing AWS access keys through app
The Redaction Settings tab now has boxes for entering the AWS access key and secret key. If you paste the relevant keys into these boxes before performing redaction, you should be able to use these services in the app.
Picking up AWS access keys through an .env file
The app also has the capability of picking up AWS access key details through a .env file located in a ‘/config/aws_config.env’ file (default), or alternative .env file location specified by the environment variable AWS_CONFIG_PATH. The env file should look like the following with just two lines:
AWS_ACCESS_KEY= your-access-key AWS_SECRET_KEY= your-secret-key
The app should then pick up these keys when trying to access the AWS Textract and Comprehend services during redaction.
Advanced OCR model options
The app supports advanced OCR options that combine multiple OCR engines for improved accuracy. These options are not enabled by default but can be configured by changing the app_config.env file in your ‘/config’ folder, or system environment variables in your system.
Available OCR models
A range of local and cloud OCR models are available for text extraction. The options shown in the app depend on which environment variables are enabled in your app_config.env file (see Enabling advanced OCR options below). Once enabled, the models appear under ‘Change default redaction settings’ on the ‘Redact PDFs/images’ tab.

- Tesseract (
tesseract, default, requiresSHOW_LOCAL_OCR_MODEL_OPTIONS=True): Best for documents with clear, well-formatted text. Provides a good balance of speed and accuracy with precise word-level bounding boxes, but struggles with handwriting or noisy/scanned documents. - PaddleOCR (
paddle, requiresSHOW_PADDLE_MODEL_OPTIONS=True): More powerful than Tesseract and handles unclear typed text on scanned documents reasonably well, but is slower. Word-level bounding boxes are estimated from line-level output so may be less precise. - VLM (
vlm, requiresSHOW_VLM_MODEL_OPTIONS=True): Uses a Vision Language Model locally (recommended: Qwen 3.5, configurable via theSELECTED_LOCAL_TRANSFORMERS_VLM_MODELenvironment variable). Excellent for difficult handwriting and noisy documents, but significantly slower than the options above. Inference runs via thetransformerspackage and can be quantised withbitsandbytesifQUANTISE_VLM_MODELS=True; for faster inference, use an inference server instead. - Inference server (
inference-server, requiresSHOW_INFERENCE_SERVER_VLM_OPTIONS=True): Uses an OpenAI-compatible API endpoint such as llama-cpp (llama-server) or vLLM. Produces results comparable to the in-app VLM but is much faster, and supports GGUF or AWQ/GPTQ quantised models. Requires a separately configured server. See below for details. - AWS Bedrock VLM (
AWS Bedrock VLM OCR - all PDF types, requiresSHOW_BEDROCK_VLM_MODELS=True): Cloud-based OCR using a Bedrock vision model (e.g. Qwen VL). Extracts text and optionally detects people and signatures from PDFs and images without a local GPU. Requires AWS credentials and Bedrock model access, and is subject to Bedrock quotas and pricing.
Hybrid options
Hybrid models (enabled with SHOW_HYBRID_MODELS=True) use PaddleOCR first to identify bounding boxes and extract text, then pass low-confidence regions to a more powerful model for correction. Note: In practice, results are not significantly better than using Paddle or VLM/inference server analysis alone (particularly with Qwen 3 VL), but the options are provided for comparison.
- Hybrid-paddle-vlm (
hybrid-paddle-vlm): Combines PaddleOCR’s bounding box detection with an in-app VLM for low-confidence regions. PaddleOCR’s stronger bounding box identification makes this the most practical hybrid option, provided both Paddle and the VLM model can run in the same environment. - Hybrid-paddle-inference-server (
hybrid-paddle-inference-server): The same as above but uses an inference server instead of an in-app VLM, allowing the use of GGUF or AWQ/GPTQ quantised models via llama.cpp or vLLM. See below for details.
Enabling advanced OCR options
To enable these options, you need to change your system environment variables, or modify the app_config.env file in your ‘/config’ folder and set the following environment variables:
Basic OCR model selection:
SHOW_LOCAL_OCR_MODEL_OPTIONS=TrueTo enable PaddleOCR options (paddle):
SHOW_PADDLE_MODEL_OPTIONS=TrueTo enable Vision Language Model options (vlm):
SHOW_VLM_MODEL_OPTIONS=TrueTo enable AWS Bedrock VLM OCR (cloud-based VLM text extraction):
SHOW_BEDROCK_VLM_MODELS=TrueTo enable Inference Server options (inference-server):
SHOW_INFERENCE_SERVER_VLM_OPTIONS=TrueTo enable Hybrid OCR options (hybrid-paddle-vlm, hybrid-paddle-inference-server):
SHOW_HYBRID_MODELS=TrueSee the app settings documentation, or below, for more details on these options. Once enabled, when running the app, you will see a “Change default local OCR model” (or text extraction method) section in the redaction settings where they can choose between the available models based on what has been enabled, including Bedrock VLM analysis when configured.
OCR configuration parameters
The following parameters can be configured to fine-tune OCR behaviour. Set them in your app_config.env file or as system environment variables. See the app settings documentation for a full reference.
General OCR settings
- DEFAULT_LOCAL_OCR_MODEL (default:
"tesseract"): Sets the default OCR engine without requiring a UI selection. Valid values:"tesseract","paddle","vlm","inference-server","hybrid-paddle-vlm","hybrid-paddle-inference-server". - SHOW_LOCAL_OCR_MODEL_OPTIONS (default: False): If enabled, users can select the local OCR model from the UI.
- SHOW_OCR_GUI_OPTIONS (default: True): If enabled, OCR-related options (e.g. model selection, Paddle options) are shown in the UI.
- EFFICIENT_OCR (default: False): If enabled, uses a two-step process for PDFs — tries selectable text extraction per page first and only runs OCR on pages where no text could be extracted. Saves time and cost.
- EFFICIENT_OCR_MIN_WORDS (default: 20): Minimum extractable words on a page to use the text-only route when
EFFICIENT_OCRis enabled; pages below this threshold go through OCR. - EFFICIENT_OCR_MIN_IMAGE_COVERAGE_FRACTION (default: 0.03): When
EFFICIENT_OCRis enabled, the minimum fraction of the page area a single embedded image must cover for that page to be routed through OCR regardless of word count. Set to0to rely on word count only. - MERGE_BOUNDING_BOXES (default: True): When enabled, merges nearby bounding boxes in OCR/Textract results (reconstruction, grouping, and horizontal merge).
- MODEL_CACHE_PATH (default:
"./model_cache"): Directory where OCR models are cached locally. - OVERWRITE_EXISTING_OCR_RESULTS (default: False): If enabled, always runs OCR fresh instead of loading from existing JSON result files.
- HF_TOKEN (default:
''): Hugging Face token. Required for downloading gated or private VLM models from the Hub.
Tesseract settings
- TESSERACT_SEGMENTATION_LEVEL (default: 11): Tesseract PSM (Page Segmentation Mode) level. Valid values are 0–13. Higher values provide more detailed segmentation but may be slower.
- TESSERACT_WORD_LEVEL_OCR (default: True): If enabled, uses Tesseract word-level OCR rather than line-level.
- TESSERACT_MAX_WORKERS (default: 4): Maximum number of worker threads for running Tesseract on multiple pages in parallel. Keep lower than
MAX_WORKERSto avoid saturating CPU/RAM. - TESSERACT_FOLDER (default:
''): Path to the local Tesseract installation folder. On Windows, install Tesseract 5.5.0 from UB-Mannheim/tesseract and point this variable at the folder (e.g.tesseract/). - TESSERACT_DATA_FOLDER (default:
"/usr/share/tessdata"): Path to the Tesseract trained data files (tessdata).
PaddleOCR settings
- SHOW_PADDLE_MODEL_OPTIONS (default: False): If enabled, PaddleOCR options will be shown in the UI.
- PADDLE_USE_TEXTLINE_ORIENTATION (default: False): If enabled, PaddleOCR will detect and correct text line orientation.
- PADDLE_DET_DB_UNCLIP_RATIO (default: 1.2): Controls the expansion ratio of detected text regions. Higher values expand the detection area more.
- CONVERT_LINE_TO_WORD_LEVEL (default: False): If enabled, converts PaddleOCR line-level results to approximate word-level bounding boxes for better precision.
- LOAD_PADDLE_AT_STARTUP (default: False): If enabled, loads the PaddleOCR model when the application starts, reducing latency for first use but increasing startup time.
- PADDLE_MAX_WORKERS (default: 2): Maximum number of worker threads for running PaddleOCR on multiple pages in parallel. Paddle is often GPU-bound; keep this low (e.g. 1–2) to avoid VRAM contention.
- PADDLE_MODEL_PATH (default:
''): Custom directory for PaddleOCR model storage, useful for environments like AWS Lambda. - PADDLE_FONT_PATH (default:
''): Custom font path for PaddleOCR. If empty, the app uses system fonts. - POPPLER_FOLDER (default:
''): Path to the local Popplerbinfolder, required for PDF-to-image conversion. On Windows, install from oschwartz10612/poppler-windows and point this at thebinfolder (e.g.poppler/poppler-24.02.0/Library/bin/).
Image preprocessing
- PREPROCESS_LOCAL_OCR_IMAGES (default: True): If enabled, images are preprocessed before local OCR. Testing has shown this doesn’t always improve results and can slow processing — consider setting to
Falseif speed is a priority. - SAVE_PREPROCESS_IMAGES (default: False): If enabled, saves the preprocessed images for debugging.
- SAVE_PAGE_OCR_VISUALISATIONS (default: False): If enabled, saves images with detected bounding boxes overlaid on page images for debugging.
- INCLUDE_OCR_VISUALISATION_IN_OUTPUT_FILES (default: False): If enabled, includes OCR visualisation files (created when
SAVE_PAGE_OCR_VISUALISATIONSis True) in the final output file list shown in the Gradio interface.
Vision Language Model (VLM) settings
- SHOW_VLM_MODEL_OPTIONS (default: False): If enabled, VLM OCR options will be shown in the UI.
- SELECTED_LOCAL_TRANSFORMERS_VLM_MODEL (default:
"Qwen3-VL-8B-Instruct"): The local transformers VLM model to use for OCR. Available options:"Nanonets-OCR2-3B","Dots.OCR","Qwen3-VL-2B-Instruct","Qwen3-VL-4B-Instruct","Qwen3-VL-8B-Instruct","Qwen3-VL-30B-A3B-Instruct","Qwen3-VL-235B-A22B-Instruct","PaddleOCR-VL". Generally the Qwen 3 VL range offers the best accuracy. - OVERRIDE_VLM_REPO_ID (default:
''): If non-empty, overrides the Hugging Face repo ID or local path used for the selected VLM. Useful for pointing at a custom checkpoint or local folder. - LOAD_TRANSFORMERS_VLM_MODEL_AT_START (default: True): If enabled, loads the VLM weights at application startup. If disabled, weights load on the first VLM OCR call — reducing startup memory at the cost of a slower first run.
- QUANTISE_VLM_MODELS (default: False): If enabled, quantises VLM models to 4-bit using
bitsandbytesto reduce VRAM requirements. - MAX_NEW_TOKENS (default: 4096): Maximum number of tokens the VLM may generate per response.
- MAX_INPUT_TOKEN_LENGTH (default: 8192): Maximum number of tokens that can be input to the VLM.
- VLM_MAX_IMAGE_SIZE (default: 819200): Upper bound on total pixels (width × height) for images sent to the VLM. Larger images are downscaled while preserving aspect ratio.
- VLM_MIN_IMAGE_SIZE (default: 614400): Minimum total pixels for full-page VLM OCR. Smaller pages are upscaled.
- VLM_HYBRID_MIN_IMAGE_SIZE (default: 153600): Minimum total pixels for hybrid VLM line/crop passes. Smaller crops are upscaled.
- VLM_MIN_DPI (default: 200.0): Minimum effective DPI after image preparation. Images below this DPI are upscaled.
- VLM_MAX_DPI (default: 300.0): Maximum effective DPI after image preparation. High-DPI scans are downscaled accordingly.
- VLM_MAX_ASPECT_RATIO (default: 10.0): Upper bound on image aspect ratio sent to the VLM. Very long/thin crops (e.g. hybrid line regions) are white-padded to stay within this limit.
- USE_FLASH_ATTENTION (default: False): If enabled, uses flash attention for improved VLM performance. Not available on Windows.
- VLM_DISABLE_QWEN3_5_THINKING (default: False): If enabled, disables the Qwen3.5 “thinking” chain for local transformers VLM calls, making responses faster by skipping the reasoning step.
- MAX_SPACES_GPU_RUN_TIME (default: 60): Maximum seconds to run GPU operations on Hugging Face Spaces.
- ADD_VLM_BOUNDING_BOX_RULES (default: False): If enabled, adds bounding box rules to the VLM prompt (e.g. coordinate format constraints for OCR output).
- REPORT_VLM_OUTPUTS_TO_GUI (default: False): If enabled, reports VLM outputs to the GUI with info boxes as they are processed — useful for monitoring long OCR jobs.
- SAVE_VLM_INPUT_IMAGES (default: False): If enabled, saves input images sent to the VLM for debugging.
- VLM_SEED (default:
''): Random seed for VLM generation. If empty, generation is non-deterministic. - VLM generation parameters (
VLM_DEFAULT_TEMPERATURE,VLM_DEFAULT_TOP_P,VLM_DEFAULT_MIN_P,VLM_DEFAULT_TOP_K,VLM_DEFAULT_REPETITION_PENALTY,VLM_DEFAULT_DO_SAMPLE,VLM_DEFAULT_PRESENCE_PENALTY): Control sampling behaviour for VLM generation. All default to''(model-specific defaults are used when empty).
Inference server settings
- SHOW_INFERENCE_SERVER_VLM_OPTIONS (default: False): If enabled, inference server OCR options will be shown in the UI.
- INFERENCE_SERVER_API_URL (default:
"http://localhost:8080"): Base URL of the inference server API for remote VLM OCR processing. - INFERENCE_SERVER_MODEL_NAME (default:
''): Optional model name to send in inference server API requests. If empty, the server’s default model is used. - DEFAULT_INFERENCE_SERVER_VLM_MODEL (default:
"qwen_3_vl_30b_a3b_it"): Default model name for inference server VLM OCR calls. - INFERENCE_SERVER_TIMEOUT (default: 300): Timeout in seconds for inference server API requests.
- INFERENCE_SERVER_DISABLE_THINKING (default: False): If enabled, disables chain-of-thought “thinking” for inference server VLM calls (adds
{"enable_thinking": false}to request payloads). Useful when running a Qwen3.5 reasoning model and thinking tokens are unnecessary, such as in hybrid line-crop OCR — eliminates overhead and avoids needing a largeHYBRID_OCR_MAX_NEW_TOKENSbudget. - SHOW_INFERENCE_SERVER_VLM_MODEL_OPTIONS (default: False): If enabled, allows users to select from available inference server VLM models in the UI.
Hybrid OCR settings
- SHOW_HYBRID_MODELS (default: False): If enabled, hybrid OCR options (
hybrid-paddle-vlm,hybrid-paddle-inference-server) will be shown in the UI. - HYBRID_OCR_CONFIDENCE_THRESHOLD (default: 95): Confidence score below which the secondary OCR engine (VLM or inference server) will be used for re-extraction. Lower values mean more text will be re-extracted by the secondary model.
- HYBRID_OCR_PADDING (default: 1): Padding in pixels added to word bounding boxes before re-extraction with the secondary engine.
- HYBRID_OCR_MAX_NEW_TOKENS (default: 1024): Maximum tokens the inference server (or local VLM) may generate per hybrid line-crop OCR call. For reasoning models like Qwen3.5, thinking tokens count against this budget — increase to 2048 or higher if you see “Inference server returned no results” when using
hybrid-paddle-inference-serverwith a reasoning model. - HYBRID_OCR_MAX_WORDS (default: 50): Maximum words allowed in a hybrid OCR result for a single text line. Results exceeding this are discarded as likely hallucinations, and the original OCR result is kept instead.
- SAVE_EXAMPLE_HYBRID_IMAGES (default: False): If enabled, saves comparison images showing Tesseract vs. secondary engine results when using hybrid modes.
Inference server options
If using a local inference server, I would suggest using llama.cpp, or vLLM as they are much faster than transformers/torch inference provided in the app through the ‘vlm’ OCR route or ‘Local Transformers LLM’ route. Llama.cpp is more flexible than vLLM for low VRAM systems, as Llama.cpp will offload to cpu/system RAM automatically rather than failing as vLLM tends to do.
To help with installation of the Redaction app with Llama.cpp and vLLM, I have created Docker compose files for both Llama.cpp and vLLM. These can be found in the doc_redaction repo. For Llama.cpp, you can use the docker-compose_llama.yml file, and for vLLM, you can use the docker-compose_vllm.yml file. To run, Docker / Docker Desktop should be installed, and then you can run the commands suggested in the top of the files to run the servers.
You will need ~30-50GB of disk space to run everything depending on the model chosen from the Compose file. For the vLLM server, you will need 24 GB VRAM. For the Llama.cpp server, 24 GB VRAM is needed to run at full speed, but the n-gpu-layers and n-cpu-moe parameters in the Docker compose file can be adjusted to fit into your system. I would suggest that 8 GB VRAM is needed as a bare minimum for decent inference speed. See the Unsloth guide for more details on working with GGUF files for Qwen 3.5.
Identifying people and signatures with VLMs
If VLM or inference server options are enabled, you can also use the VLM to identify photos of people’s faces and signatures in the document, and redact them accordingly.
On the ‘Redaction Settings’ tab, select the CUSTOM_VLM_FACES and CUSTOM_VLM_SIGNATURE entities. When you conduct an OCR task with the VLM or inference server, it will identify the bounding boxes for photos of people’s faces and signatures in the document, and redact them accordingly if a redaction option is selected.
With Efficient OCR enabled, CUSTOM_VLM_FACES follows the same page rules as OCR (VLM only on OCR-classified pages); CUSTOM_VLM_SIGNATURE still scans all pages. Textract Extract signatures uses full-document Textract OCR and disables Efficient OCR.
PII identification with LLMs
In addition to rule-based (Local) and AWS Comprehend PII detection, the app can use Large Language Models (LLMs) to identify and label personal information. This is useful for entity types that are context-dependent (e.g. job titles, organisation names) or when you want custom instructions (e.g. “do not redact the name of the university”). LLM-based PII can be run via AWS Bedrock, a local transformers model, or a local inference server (e.g. llama.cpp, vLLM).
Options (when enabled by your administrator):
- LLM (AWS Bedrock): Uses a Bedrock model (e.g. Claude, Nova) for PII detection. Requires AWS credentials and Bedrock model access. No local GPU needed.
- Local transformers LLM: Runs a Hugging Face transformers model on your machine for PII detection. Requires sufficient RAM/VRAM. The default model is Qwen 3.5 9B; other supported models include Qwen 3.5 (0.8B–122B), Gemma 3 (12B/27B), GPT-OSS 20B, Ministral 3 14B, and NVIDIA Nemotron 3 30B (see the config.py file for the updated list).
- Local inference server: Sends text to an OpenAI-compatible API (e.g. llama.cpp, vLLM) for PII detection. You run the server separately; the app only calls the API. Note: this uses
INFERENCE_SERVER_API_URL, the same URL endpoint used for VLM OCR. See Inference server options for installation, as calls to the Local inference server will use the same model as the OCR inference-server model by default.
Using LLM PII detection
On the ‘Redact PDFs/images’ tab, under ‘Redaction settings’, choose the desired PII identification method. You can then:
- Select which LLM entities to detect (e.g. NAME, EMAIL_ADDRESS, PHONE_NUMBER, ADDRESS, CUSTOM). Custom entity types can also be added directly in the dropdown box.
- Optionally add custom instructions to guide the LLM — for example:
"Do not redact company names"or"Redact all organisation names with the label ORGANISATION". When custom instructions are provided, the app can optionally use a more capable model (seeCLOUD_LLM_PII_CUSTOM_INSTRUCTIONS_MODEL_CHOICEbelow).
The LLM processes text page by page. Results include entity type, text span, and confidence score, which are then used to place redaction boxes in the same way as the local or Comprehend methods.
Enabling LLM PII options
Visibility of these methods is controlled by environment variables in app_config.env:
- SHOW_AWS_BEDROCK_LLM_MODELS (default: False): Show “LLM (AWS Bedrock)” in the PII identification dropdown.
- SHOW_TRANSFORMERS_LLM_PII_DETECTION_OPTIONS (default: False): Show “Local transformers LLM”.
- SHOW_INFERENCE_SERVER_PII_OPTIONS (default: False): Show “Local inference server”.
LLM PII configuration variables
Model selection
- CLOUD_LLM_PII_MODEL_CHOICE (default:
"amazon.nova-pro-v1:0"): Default Bedrock (or cloud) model ID for LLM-based PII detection. - CLOUD_LLM_PII_CUSTOM_INSTRUCTIONS_MODEL_CHOICE (default:
"amazon.nova-pro-v1:0"): If non-empty, overridesCLOUD_LLM_PII_MODEL_CHOICEwhen custom instructions are provided. Leave empty to always useCLOUD_LLM_PII_MODEL_CHOICE. - LOCAL_TRANSFORMERS_LLM_PII_MODEL_CHOICE (default:
"Qwen 3.5 9B"): The local transformers model for PII detection. Supported values:"Qwen 3.5 0.8B","Qwen 3.5 2B","Qwen 3.5 4B","Qwen 3.5 9B","Qwen 3.5 27B","Qwen 3.5 35B-A3B","Qwen 3.5 122B-A10B","Gemma 3 12B","Gemma 3 27B","GPT-OSS 20B","Ministral 3 14B Instruct","NVIDIA Nemotron 3 Nano 30B A3B NVFP4". - USE_TRANSFORMERS_VLM_MODEL_AS_LLM (default: False): If enabled, reuses the already-loaded VLM model (
SELECTED_LOCAL_TRANSFORMERS_VLM_MODEL) for LLM PII detection instead of downloading a separate model. The VLM weights must already be loaded (e.g. from a prior VLM OCR run, orLOAD_TRANSFORMERS_VLM_MODEL_AT_START=True). - LOAD_TRANSFORMERS_LLM_PII_MODEL_AT_START (default: False): If enabled, loads the local transformers PII model at application startup to reduce latency on first use.
- CHOSEN_LLM_PII_INFERENCE_METHOD (default:
"aws-bedrock"): Sets the default inference method programmatically. Options:"aws-bedrock","local","inference-server","azure-openai","gemini". - DEFAULT_INFERENCE_SERVER_PII_MODEL (default:
"gemma_3_12b"): Default model name for inference-server LLM PII detection calls. - INFERENCE_SERVER_API_URL (default:
"http://localhost:8080"): Base URL for the inference server used for LLM PII detection. Distinct fromINFERENCE_SERVER_API_URL, which is used for VLM OCR. - DEFAULT_PII_DETECTION_MODEL: Default PII detection method shown selected in the UI on startup. Automatically defaults to AWS Comprehend if
SHOW_AWS_PII_DETECTION_OPTIONSis enabled, otherwise defaults to the local model.
Entity configuration
- CHOSEN_LLM_ENTITIES: Default entity types pre-selected for LLM detection (e.g.
EMAIL_ADDRESS,ADDRESS,NAME,PHONE_NUMBER,CUSTOM). Configurable as a comma-separated list. - FULL_LLM_ENTITY_LIST: Full list of entity types available in the LLM entity selection dropdown.
Generation parameters
- LLM_TEMPERATURE (default: 0.1): Sampling temperature for LLM generation. Lower values produce more deterministic output — recommended for PII detection.
- LLM_MAX_NEW_TOKENS (default: 8192): Maximum tokens the LLM may generate per PII detection call.
- LLM_SEED (default: 42): Random seed for reproducible results.
- LLM_CONTEXT_LENGTH (default: 32768): Maximum context length for the local transformers LLM.
- REASONING_SUFFIX: Suffix appended to prompts for reasoning-capable models to control chain-of-thought behaviour. Examples:
"/nothink"for Qwen 3.5 (disables thinking),"Reasoning: low"for GPT-OSS 20B,""for models without reasoning modes. Set automatically based onLOCAL_TRANSFORMERS_LLM_PII_MODEL_CHOICE. - MULTIMODAL_PROMPT_FORMAT (default: False): If enabled, uses a multimodal prompt format. Auto-set to True for some model choices (e.g. Gemma 3 12B/27B).
- PRINT_TRANSFORMERS_USER_PROMPT (default: False): If enabled, prints the system and user prompts to the console when calling the local transformers LLM. Useful for debugging; avoid in production if logs are sensitive.
- Additional LLM generation parameters:
LLM_TOP_K(default: 64),LLM_MIN_P(default: 0),LLM_TOP_P(default: 0.95),LLM_REPETITION_PENALTY(default: 1.0),LLM_STREAM(default: True),LLM_RESET(default: False),SPECULATIVE_DECODING(default: False),ASSISTANT_MODEL(empty),LLM_MODEL_DTYPE(default:"bfloat16").
Command Line Interface (CLI)
The app includes a comprehensive command-line interface (cli_redact.py) that allows you to perform redaction, deduplication, AWS Textract batch operations, and document summarisation directly from the terminal. This is particularly useful for batch processing, automation, and integration with other systems.
Getting started with the CLI
To use the CLI, you need to:
- Open a terminal window
- Navigate to the app folder containing
cli_redact.py - Activate your virtual environment (conda or venv)
- Run commands using
python cli_redact.pyfollowed by your options
Basic CLI syntax
python cli_redact.py --task [redact|deduplicate|textract|summarise] --input_file [file_path] [additional_options]Default task is redact if --task is omitted.
Redaction examples
Basic PDF redaction with default settings:
python cli_redact.py --input_file example_data/example_of_emails_sent_to_a_professor_before_applying.pdfExtract text only (no redaction) with whole page redaction:
python cli_redact.py --input_file example_data/Partnership-Agreement-Toolkit_0_0.pdf --redact_whole_page_file example_data/partnership_toolkit_redact_some_pages.csv --pii_detector NoneRedact with custom entities and allow list:
python cli_redact.py --input_file example_data/graduate-job-example-cover-letter.pdf --allow_list_file example_data/test_allow_list_graduate.csv --local_redact_entities TITLES PERSON DATE_TIMERedact with fuzzy matching and custom deny list:
python cli_redact.py --input_file example_data/Partnership-Agreement-Toolkit_0_0.pdf --deny_list_file example_data/Partnership-Agreement-Toolkit_test_deny_list_para_single_spell.csv --local_redact_entities CUSTOM_FUZZY --page_min 1 --page_max 3 --fuzzy_mistakes 3Redact with AWS services:
python cli_redact.py --input_file example_data/example_of_emails_sent_to_a_professor_before_applying.pdf --ocr_method "AWS Textract" --pii_detector "AWS Comprehend"Redact specific pages with signature extraction:
python cli_redact.py --input_file example_data/Partnership-Agreement-Toolkit_0_0.pdf --page_min 6 --page_max 7 --ocr_method "AWS Textract" --handwrite_signature_extraction "Extract handwriting" "Extract signatures"Redact with LLM PII (entity subset and custom instructions):
When your deployment uses an LLM-based PII method (e.g. via config/defaults), you can pass LLM entities and instructions:
python cli_redact.py --input_file example_data/example_of_emails_sent_to_a_professor_before_applying.pdf --llm_redact_entities NAME EMAIL_ADDRESS PHONE_NUMBER ADDRESS CUSTOM --custom_llm_instructions "Do not redact the name of the university."Tabular data redaction
Anonymize CSV file with specific columns:
python cli_redact.py --input_file example_data/combined_case_notes.csv --text_columns "Case Note" "Client" --anon_strategy replace_redactedAnonymize Excel file:
python cli_redact.py --input_file example_data/combined_case_notes.xlsx --text_columns "Case Note" "Client" --excel_sheets combined_case_notes --anon_strategy redactAnonymize Word document:
python cli_redact.py --input_file "example_data/Bold minimalist professional cover letter.docx" --anon_strategy replace_redactedDuplicate detection
Find duplicate pages in OCR files:
python cli_redact.py --task deduplicate --input_file example_data/example_outputs/doubled_output_joined.pdf_ocr_output.csv --duplicate_type pages --similarity_threshold 0.95Find duplicates at line level:
python cli_redact.py --task deduplicate --input_file example_data/example_outputs/doubled_output_joined.pdf_ocr_output.csv --duplicate_type pages --similarity_threshold 0.95 --combine_pages False --min_word_count 3Find duplicate rows in tabular data:
python cli_redact.py --task deduplicate --input_file example_data/Lambeth_2030-Our_Future_Our_Lambeth.pdf.csv --duplicate_type tabular --text_columns "text" --similarity_threshold 0.95AWS Textract operations
Submit document for analysis:
python cli_redact.py --task textract --textract_action submit --input_file example_data/example_of_emails_sent_to_a_professor_before_applying.pdfSubmit with signature extraction:
python cli_redact.py --task textract --textract_action submit --input_file example_data/Partnership-Agreement-Toolkit_0_0.pdf --extract_signaturesRetrieve results by job ID:
python cli_redact.py --task textract --textract_action retrieve --job_id 12345678-1234-1234-1234-123456789012List recent jobs:
python cli_redact.py --task textract --textract_action listDocument summarisation
Summarise OCR output CSV(s) with AWS Bedrock:
python cli_redact.py --task summarise --input_file example_data/example_outputs/Partnership-Agreement-Toolkit_0_0.pdf_ocr_output.csv --summarisation_inference_method "LLM (AWS Bedrock)"Summarise with local LLM and detailed format:
python cli_redact.py --task summarise --input_file example_data/example_outputs/Partnership-Agreement-Toolkit_0_0.pdf_ocr_output.csv --summarisation_inference_method "Local transformers LLM" --summarisation_format detailedSummarise with context and extra instructions (concise format):
python cli_redact.py --task summarise --input_file example_data/example_outputs/Partnership-Agreement-Toolkit_0_0.pdf_ocr_output.csv --summarisation_context "This is a partnership agreement" --summarisation_additional_instructions "Focus on key obligations and termination clauses" --summarisation_format conciseSummarise multiple OCR CSV files:
python cli_redact.py --task summarise --input_file example_data/example_outputs/Partnership-Agreement-Toolkit_0_0.pdf_ocr_output.csv example_data/example_outputs/example_of_emails_sent_to_a_professor_before_applying_ocr_output_textract.csv --summarisation_inference_method "LLM (AWS Bedrock)"Common CLI options
General options
--task: Task to perform: “redact”, “deduplicate”, “textract”, or “summarise” (default: redact)--input_file: Path to input file(s); multiple files separated by spaces--output_dir: Directory for output files (default: output/)--input_dir: Directory for input files (default: input/)--language: Language of document content (e.g. “en”, “es”, “fr”)--username: Username for session tracking--save_to_user_folders: Save outputs under username-based subfolders (True/False)--allow_list: Path to CSV of terms to exclude from redaction (default from config)--pii_detector: PII detection method: “Local”, “AWS Comprehend”, or “None”--local_redact_entities: Local entities to redact (space-separated list)--aws_redact_entities: AWS Comprehend entities to redact (space-separated list)--aws_access_key/--aws_secret_key: AWS credentials for cloud services--aws_region: AWS region for cloud services--s3_bucket: S3 bucket name for cloud operations--cost_code: Cost code for tracking usage--save_outputs_to_s3: Upload output files to S3 after processing (True/False)--s3_outputs_folder: S3 key prefix for output files--s3_outputs_bucket: S3 bucket for outputs (defaults to –s3_bucket if not set)--do_initial_clean: Perform initial text cleaning for tabular data (True/False)--save_logs_to_csv: Save processing logs to CSV (True/False)--save_logs_to_dynamodb: Save processing logs to DynamoDB (True/False)--display_file_names_in_logs: Include file names in log output (True/False)--upload_logs_to_s3: Upload log files to S3 after processing (True/False)--s3_logs_prefix: S3 prefix for usage log files--feedback_logs_folder: Directory for feedback log files--access_logs_folder: Directory for access log files--usage_logs_folder: Directory for usage log files--paddle_model_path: Directory for PaddleOCR model storage--spacy_model_path: Directory for spaCy model storage
PDF/Image redaction options
--ocr_method: Text extraction method: “AWS Textract”, “Local OCR”, or “Local text”--chosen_local_ocr_model: Local OCR model (e.g. “tesseract”, “paddle”, “hybrid-paddle”, “hybrid-vlm”, “inference-server”)--page_min/--page_max: Page range to process (0 for page_max means all pages)--images_dpi: DPI for image processing (default: 300.0)--preprocess_local_ocr_images: Preprocess images before OCR (True/False)--compress_redacted_pdf: Compress the final redacted PDF (True/False)--return_pdf_end_of_redaction: Return PDF at end of redaction (True/False)--allow_list_file/--deny_list_file: Paths to custom allow/deny list CSV files--redact_whole_page_file: Path to CSV listing pages to redact completely--handwrite_signature_extraction: Textract options (“Extract handwriting”, “Extract signatures”)--extract_forms: Extract forms during Textract analysis (flag)--extract_tables: Extract tables during Textract analysis (flag)--extract_layout: Extract layout during Textract analysis (flag)--vlm_model_choice: VLM model for OCR (e.g. Bedrock model ID when using cloud VLM)--inference_server_vlm_model: Inference server VLM model name for OCR--inference_server_api_url: Inference server API URL for VLM OCR--gemini_api_key: Google Gemini API key for VLM OCR--azure_openai_api_key: Azure OpenAI API key for VLM OCR--azure_openai_endpoint: Azure OpenAI endpoint URL for VLM OCR--efficient_ocr: Use efficient OCR: try selectable text first per page, run OCR only when needed (flag)--no_efficient_ocr: Disable efficient OCR (flag)--efficient_ocr_min_words: Min words on page to use text-only route; below this use OCR (default from config)
LLM PII detection options
Used when the PII method is LLM-based (e.g. via config/defaults). Model used depends on inference method.
--llm_model_choice: LLM model for PII (e.g. Bedrock model ID); defaults to config CLOUD_LLM_PII_MODEL_CHOICE for Bedrock--llm_inference_method: “aws-bedrock”, “local”, “inference-server”, “azure-openai”, or “gemini”--inference_server_pii_model: Inference server PII detection model name--llm_temperature: Temperature for LLM PII (lower = more deterministic)--llm_max_tokens: Max tokens in LLM response for PII detection--llm_redact_entities: LLM entities to detect (space-separated, e.g. NAME, EMAIL_ADDRESS, PHONE_NUMBER, ADDRESS, CUSTOM)--custom_llm_instructions: Custom instructions for LLM entity detection (e.g. “Do not redact company names”)
Tabular/Word anonymization options
--anon_strategy: One of “redact”, “redact completely”, “replace_redacted”, “entity_type”, “encrypt”, “hash”, “replace with ‘REDACTED’”, “replace with”, “mask”, “fake_first_name” --text_columns: Column names to anonymise or use for deduplication (space-separated)--excel_sheets: Excel sheet names to process (space-separated)--fuzzy_mistakes: Allowed spelling mistakes for fuzzy matching (default: 0)--match_fuzzy_whole_phrase_bool: Match fuzzy whole phrase (True/False)--do_initial_clean: Initial text cleaning for tabular data (True/False)
Duplicate detection options
--duplicate_type: Type of duplicate detection (“pages” for OCR files or “tabular” for CSV/Excel)--similarity_threshold: Similarity threshold (0-1) to consider content as duplicates (default: 0.95)--min_word_count: Minimum word count for text to be considered (default: 10)--min_consecutive_pages: Minimum number of consecutive pages to consider as a match (default: 1)--greedy_match: Use greedy matching strategy for consecutive pages (True/False)--combine_pages: Combine text from same page number within a file (True/False)--remove_duplicate_rows: Remove duplicate rows from output (True/False)
Document summarisation options
--summarisation_inference_method: “LLM (AWS Bedrock)”, “Local transformers LLM”, or “Local inference server”--summarisation_temperature: Temperature for summarisation (0.0–2.0; default: 0.6)--summarisation_max_pages_per_group: Max pages per page-group summary (default: 30)--summarisation_api_key: API key if required by the chosen LLM--summarisation_context: Additional context (e.g. “This is a consultation response document”)--summarisation_format: “concise” (key themes) or “detailed” (default)--summarisation_additional_instructions: Extra instructions (e.g. “Focus on key decisions and recommendations”)
Textract batch operations options
--textract_action: “submit”, “retrieve”, or “list”--job_id: Textract job ID for retrieve action--extract_signatures: Extract signatures during Textract analysis (flag)--textract_bucket: S3 bucket for Textract operations--textract_input_prefix: S3 prefix for input files in Textract operations--textract_output_prefix: S3 prefix for output files in Textract operations--s3_textract_document_logs_subfolder: S3 prefix for Textract job logs--local_textract_document_logs_subfolder: Local path for Textract job logs--poll_interval: Polling interval in seconds for job status (default: 30)--max_poll_attempts: Max polling attempts before timeout (default: 120)
Output files
The CLI generates the same output files as the GUI: - ...redacted.pdf: Final redacted document - ...redactions_for_review.pdf: Document with redaction boxes for review - ...review_file.csv: Detailed redaction information - ...ocr_results.csv: Extracted text results - ..._textract.json: AWS Textract results (if applicable)
For more advanced options and configuration, refer to the help text by running:
python cli_redact.py --help